Since Google’s Core Web Vitals metrics are an important ranking factor, improving them helps your WordPress website perform well in search.
Needless to say, they have a significant impact on your user experience.
However, the topic of Core Web Vitals can be a little intimidating. At first glance, this all seems very technical, especially the number of new terms you must understand.
In this article, we will define metrics and explain how to test your site’s performance. After that, we’ll give you detailed instructions on how to improve your Core Web Vitals both manually and using plugins.
Finally, we’ll do a case study to see the impact these optimization efforts have on a website.
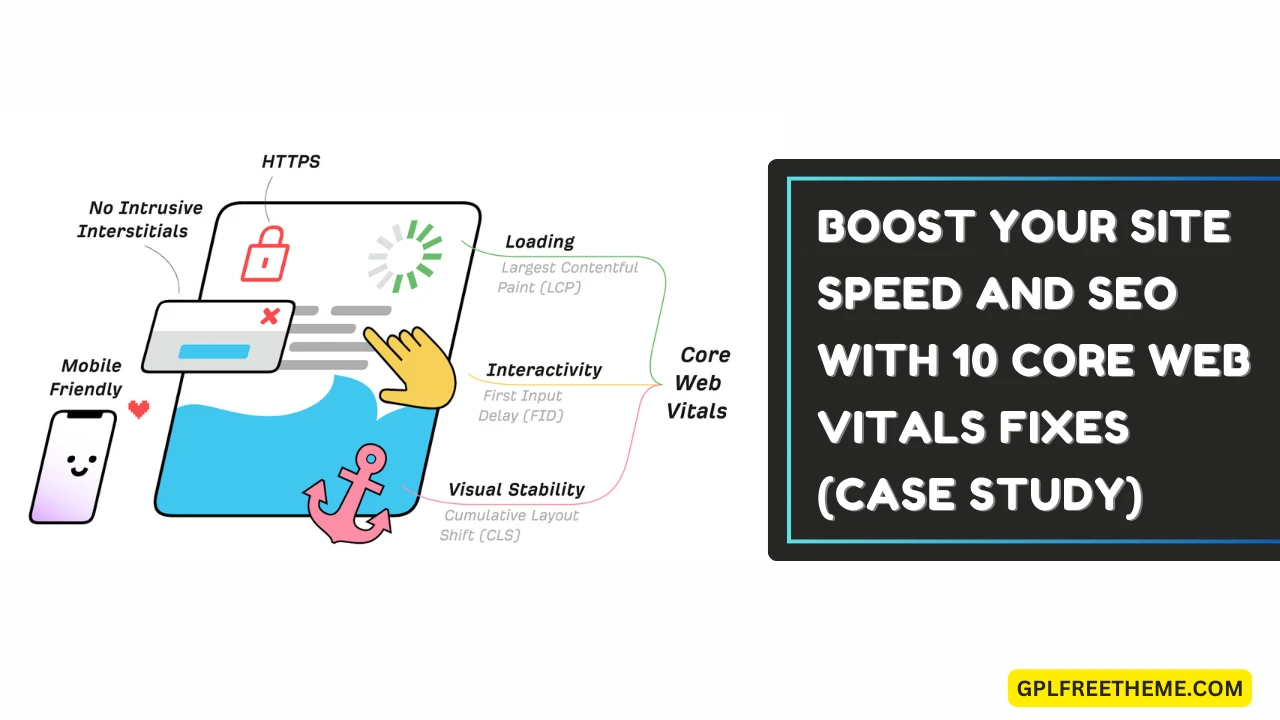
What Exactly Are Core Web Vitals?
Core Web Vitals is an umbrella term for metrics that measure the user experience on a website. Generally speaking, these are all related to loading speed and website interactivity.

Let’s go over the most important ones:
Largest Contentful Paint
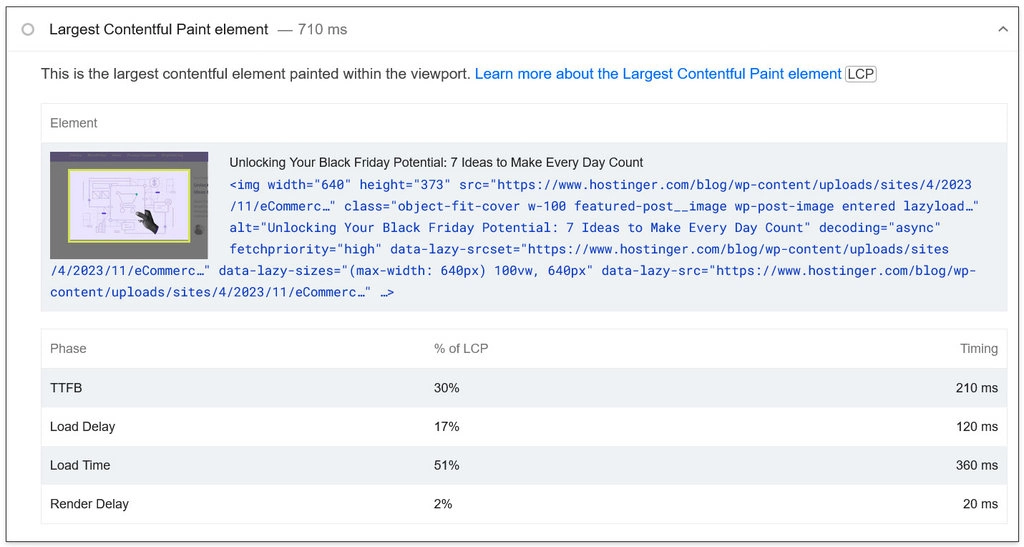
Largest Contentful Paint (LCP) measures how long it takes for a page to load to the point that it becomes viewable and usable. To do this, it tracks when visitors view the largest content element, such as an image or text block.
LCP score is measured in seconds.

Ideally, it should take up to two and a half seconds to load. In the meantime, if it takes up to four seconds, you should improve it – we’ll discuss best practices later.
Note that if an element takes more than four seconds to load, it will definitely have a negative impact on your page ranking.
Cumulative Layout Shift
Next Core Web Vitals tracks website layout stability during load. This means how much it rotates due to new elements appearing on the page.
High cumulative layout shift (CLS) can disrupt the user experience by moving text or elements that visitors are trying to interact with.

Google calculates your CLS by looking at how often a page’s content rotates while it is visible on visitors’ screens. Note that Google pays attention to how much he moves and how big his movements are. A CLS score below 0.1 is good, up to 0.25 requires improvement, and anything above that requires your immediate attention.
Note that page movement within 500 ms of user interaction will not impact your CLS score, as it is considered intentional.
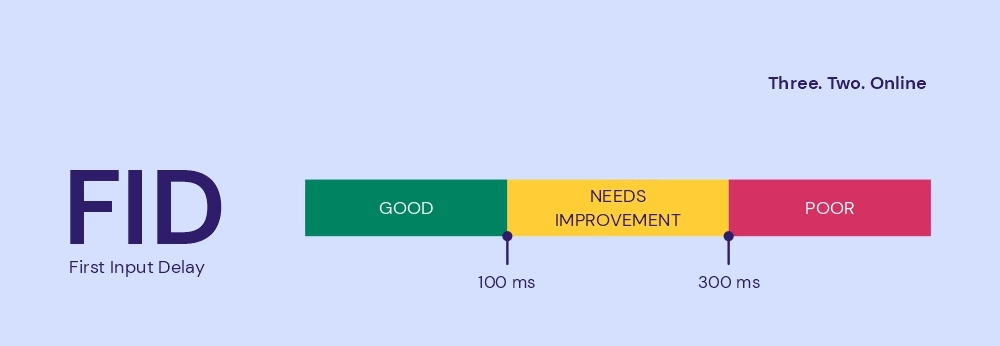
First Input Delay
First Input Delay (FID) measures the time between a visitor’s first interaction with a page element, such as a link, button or form field, and how quickly the page responds to it. Of course, the more responsive the page is, the better the user experience.
FID is closely related to Total Blocking Time (TBT). The difference between the two is that FID is based on real-life results, whereas TBT is a theoretical metric. However, when you can’t test with real-life users yet, for example, you only have a staging site, then TBT will be the closest equivalent.
First input delay is measured in milliseconds. A good score is 100 ms or less, while up to 300 ms requires improvement. If your FID is above this, Google will consider it insufficient.
Interaction to Next Paint
Interaction to Next Paint (INP) is the newest addition to Core Web Vitals and will replace FID in March 2024.
Instead of considering only the first interaction, INP tracks all interactions and shows the worst score. This way, you’ll have a more accurate picture of the page’s response.

An INP score up to 200 ms is good and a score up to 500 ms is fair. If it takes longer, it will have a negative impact on your overall Core Web Vitals score.
How to Test Your Website’s Core Web Vitals
Now that you know what scores you should strive for, let’s see how your site performs in terms of core web vitals. You can find this out through speed testing tools like GTMetrics and PageSpeed Insights.
Both work very similarly. Simply enter your web page URL and start testing. After a bit of fiddling, they will display performance results including core web vitals.
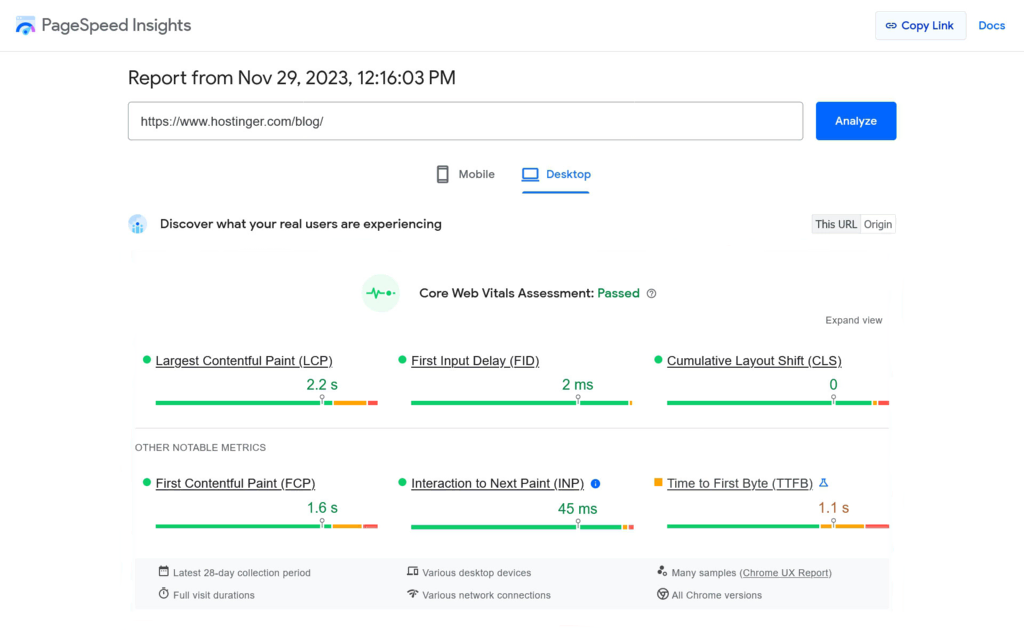
This clearly shows where your site needs improvement. It’s important to note that both speed testing tools base their results on Google’s Lighthouse, which takes measurements in a simulated environment.
However, since core web vitals are about user experience, PageSpeed Insights also displays real-life data from the Chrome User Experience report when available. Therefore, we recommend using PageSpeed Insights as it can be more reliable than GTMetrics.
Improving Core Web Vitals: A Step-by-Step Guide
The most important part is to know how to improve core Web Vitals metrics when testing is necessary. So, let’s learn about each of them and what you can do about it.
We’ll first give you the manual option and then show you how you can achieve this with WP Rocket.
How to Optimize Your Largest Contentful Paint
Reducing the biggest Contentful Paint scores requires a two-pronged approach: improving page loading speed in general and improving the delivery of your LCP elements. If you don’t know what the latter is, PageSpeed Insights will show you under Diagnostics.
Implement Caching (Page + Browser Caching)
Website caching stores page data to make access faster for visitors. The two main types of caching are page and browser caching.
The first means saving pre-rendered HTML versions of your web pages on a server and sending them directly to your visitors’ browsers. This is especially effective when using a content management system like WordPress, where pages are typically created dynamically from PHP code and content pulled from a database. Doing this in advance can save considerable processing time.
In browser caching, a copy of your website files is stored on your visitors’ hard drives. This way, they don’t have to download them again but can use them immediately from the local storage.
Your web host should take care of your page caching because it happens directly on the server. To enable browser caching, you need to add some markup to a server file called .htaccess.
Optimize the Code
Since websites largely consist of code, anything you can do to optimize its delivery and processing will help improve your Largest Contentful Paint. You have several options here:
- Text compression – enable GZIP compression to shrink your website files, making them faster to download and process in the browser.
- Minification – remove all the formatting from website files with tools like Minifier or Grunt. While line breaks, indents, and others make the text more readable for humans, they only slow the browsers down.
- CSS and JavaScript optimization – set up your CSS and JS files so that they eliminate render-blocking resources.
Preload Critical Assets
Preloading tells the browser to give priority to certain website files in the loading process instead of waiting until it’s turn to load. It also caches files, so they are immediately available when needed. You can use it for important components in the of your site with the following code:
<link rel="preload" as="script" href="
It works for scripts, style sheets, fonts and images. This is a good way to ensure that your LCP elements are fetched as quickly as possible so that they appear faster.

However, if you set everything to preload, it will have no effect. Read more about rel=preload to implement it correctly.
Optimize Images
Image optimization refers to reducing their size while maintaining good quality. Doing this is a good idea for website performance in general and your LCP images in particular. Here’s how you can do that:
- Use modern image formats – formats like WebP are much smaller than JPG or PNG.
- Size correctly – make images as large as they need to be. Don’t make visitors load data they are not going to use.
- Compress images – remove unnecessary data without affecting the visuals.
- Use lazy loading – it keeps images from loading that won’t be visible at first and only fetches them as site visitors scroll down the page. This also prevents wasting bandwidth on non-LCP images so the important ones can load faster.
Use a Content Delivery Network
A content delivery network (CDN) is a network of computers in different regions of the world that contain your website’s files. This enables people to load your website from the server closest to them.
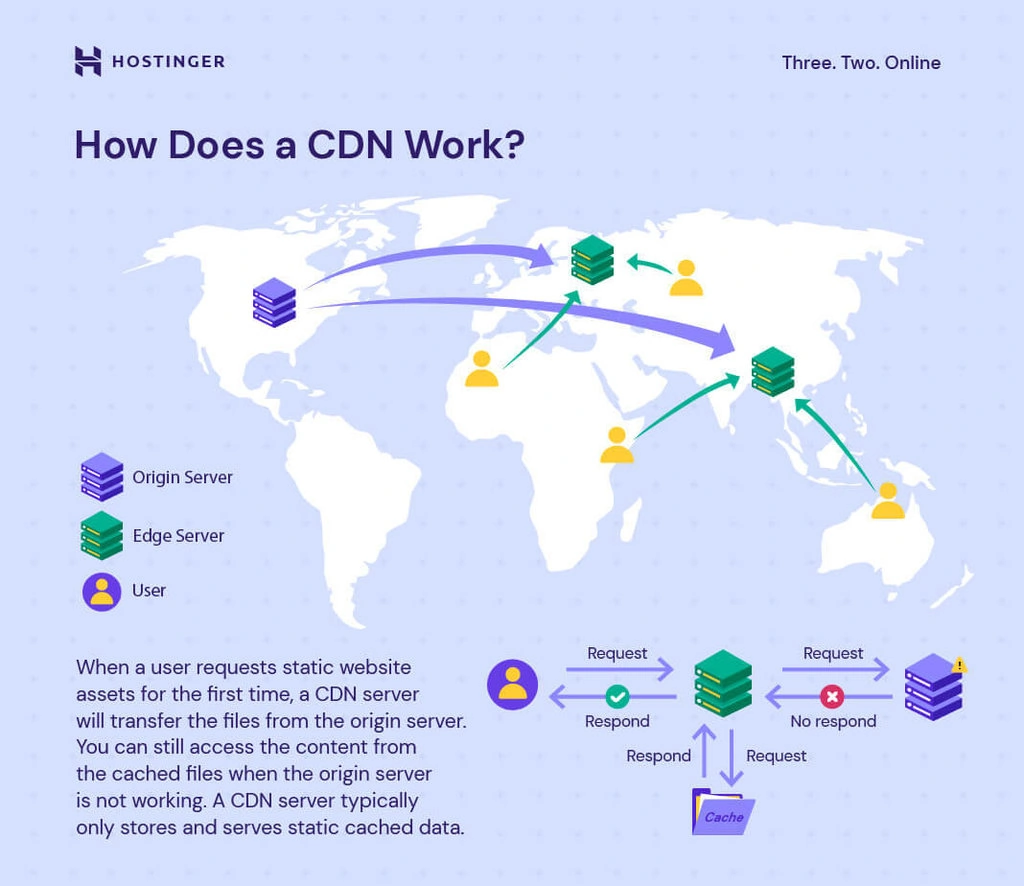
This can greatly reduce delivery times, making your entire website faster. Typically, you’ll need to purchase a content delivery network separately from your hosting account and then connect your site to it.
For your convenience and better results, we have created our own CDN.
Preconnect to Third-Party Sources
When speed-testing your website in PageSpeed Insights, you may encounter the Preconnect to Origin required warning.
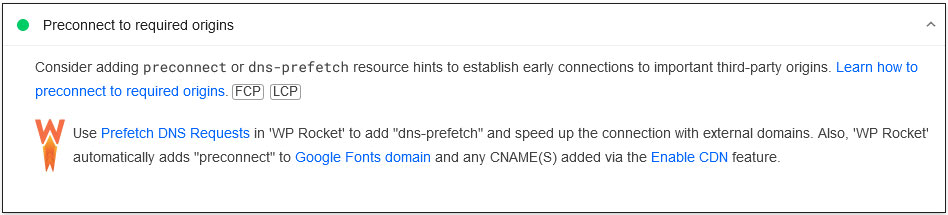
Preconnecting is similar to preloading but for third-party content such as externally hosted videos or social media content. This enables the browser to quickly establish connections with other domains so that it can quickly pull content to LCP elements if needed.
It looks like this in the main part:
<link rel=”preconnect” href= “ crossorigin>
One option is dns-prefetch. It performs a DNS lookup before connecting to another website. However, this may increase loading times, especially if you combine multiple prefetch requests.
In short, use dns-prefetch to resolve DNS for multiple assets at once, while preconnect should be reserved for establishing connections to critical resources.
Fixing Cumulative Layout Shift
In this next section, let’s talk about how you can work on cumulative layout shifts to improve your Core Web Vitals score.
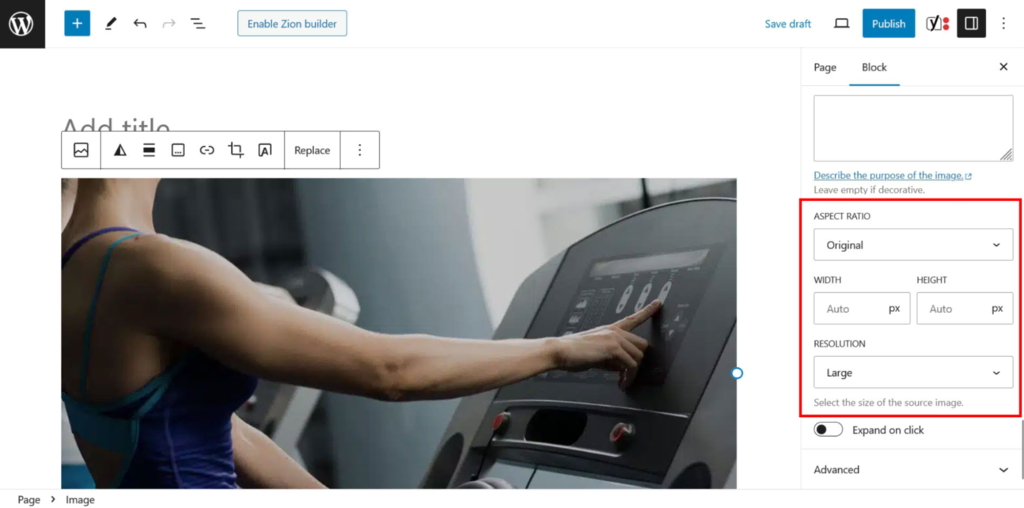
Add Image Attributes
One of the biggest contributors to layout shifts is images without height and width attributes.

With defined sizes, the browser knows how much space to reserve for it, even if the element takes longer to load. This way, it doesn’t pop into the browser out of nowhere, displacing the elements below it. This is especially important for lazy loaded media, which does not appear on the first page load.
If you’re using a WordPress version with the block editor, images should automatically have width and height attributes specified.
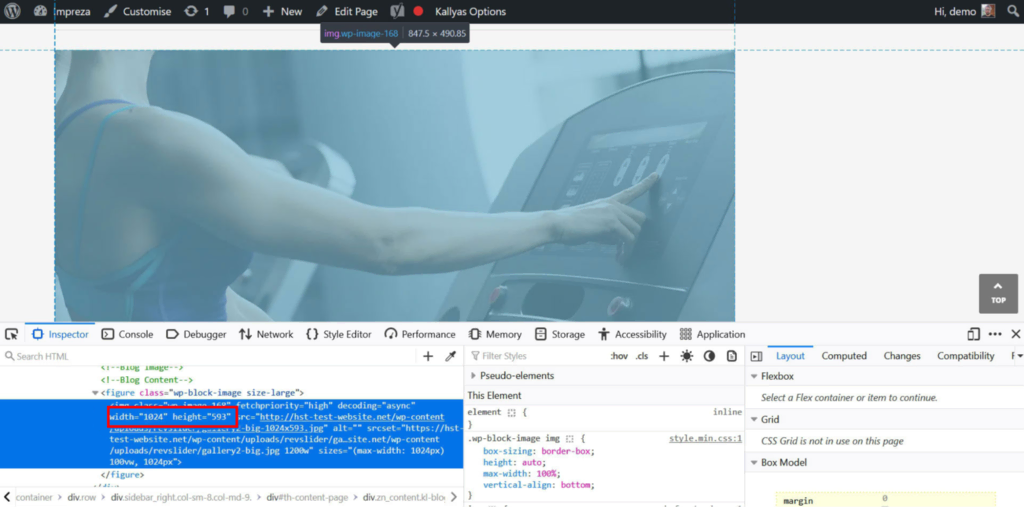
You can also set specific sizes inside the editor:
Reserve Space for Embeds, Iframes, and Ad Slots
What applies to images also applies to other dynamic content such as embedded elements or ads. It’s OK if they take longer to load, as long as you make sure the browser understands where they will appear and how much space they require. This can be problematic because you can’t always control the size of these elements.
Luckily, the WordPress editor also defines the width and height for the embed.
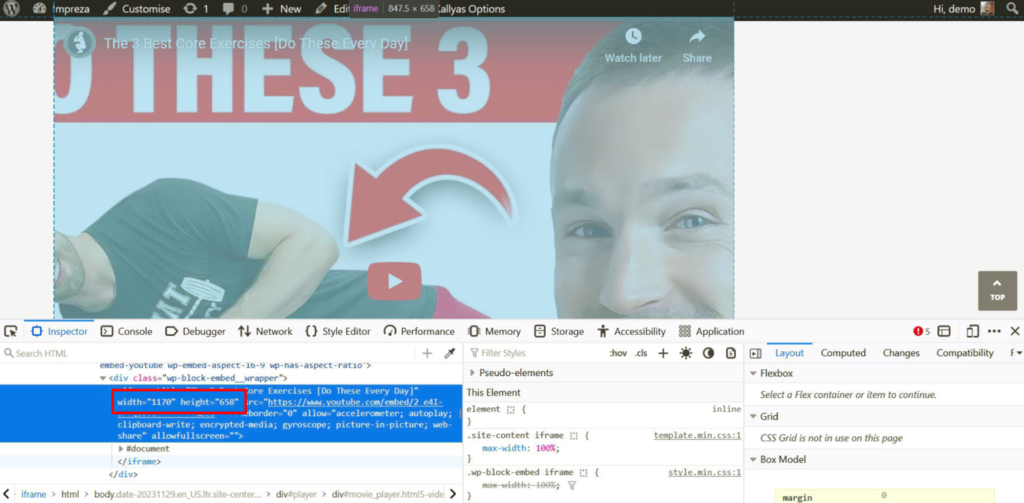
For other elements, you may have to include the sizes manually. If you don’t know the exact dimensions, at least include an estimate to reserve space. Even if the last element becomes larger, the change will not be that large, resulting in a better CLS score.
Preload and Optimize Fonts
Fonts can also cause layout shifts. When using custom fonts, the two most common problems are:
- Flash of Unstyled Text (FOUT) – a visitor first sees text in a standard font. Once the custom font loads, the text changes shape, leading to layout movement.
- Flash of Invisible Text (FOIT) – there is no visible text at all at first. It only appears together with the web font.
Strategies to avoid these include:
- Use the right font format – just like for images, there are larger and smaller file formats. WOFF or WOFF2 are usually the fastest to load.
- Define a fitting fallback font – using a fallback typeface that is very similar to your actual font avoids movement when switching from one to the other. Use Font Style Matcher to find fitting options.
- Preload fonts – place web fonts early in the document and add rel=preload so that browsers prioritize them. Using a CDN also helps with fast font delivery.
Manage Dynamic Content
Dynamic content includes elements that appear after the page is loaded. These could be lazy loaded images, banners, forms or even related products. The advice to keep them from ruining your CLS score is the same as above:
- Define containers with fixed dimensions beforehand.
- Connect their appearance with a user interaction, so it does not carry a CLS penalty.
How to Improve FID
Finally, let’s talk about what you can do to fix problems related to First Input Delay and INP. Everything we’ve already mentioned has a positive impact on FID, including caching, compression, minification, or the use of CDNs.
Furthermore, the main purpose of improving this core web vital is to optimize your code.
Optimize JavaScript
One of the biggest factors in delayed response to user input is your site’s JavaScript files. When the browser encounters a script in your website markup, it defaults to rendering your HTML until the script is downloaded and executed.
Your first option to deal with this problem is to minimize unused JavaScript. Speed test tools usually give you this warning with problematic files.

If there is a lot of unnecessary JavaScript code on your site, make sure to leave only essential code snippets.
For scripts on your website, use defer and async to control when they execute.
The defer attribute moves JavaScript execution to the end of the loading queue, while async tells the browser to download it in the background and execute only then.
Here’s an example of how to use them:
<script async src=”
<script defer src=”
Reduce Unused CSS
Everything that applies to JavaScript is also valid for CSS. Downloading and processing style sheets can keep the browser busy and delay its response to user input.
Here, you can also use the speed testing tool to find unused CSS. Split your style sheets to load important CSS first or inline it.
Optimizing Core Web Vitals: A Case Study With WP Rocket
Let’s put the technical details aside and look at a case study. We’ll show you how WP Rocket, one of the best caching plugins for WordPress, makes it very easy to improve core web vitals.
Test Setup and Initial Measurements
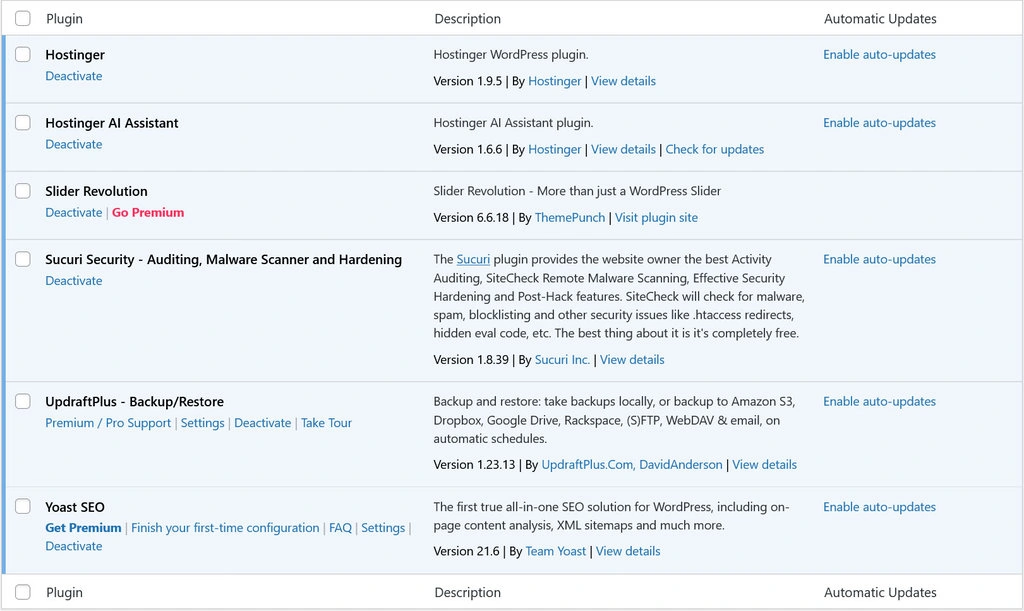
For this case study, we have set up a website on Hostinger’s Business web hosting plan. From the best free WordPress themes, we installed Kallyas and imported one of their starter sites to have realistic content on the website.

Additionally, we installed the most popular plugins for SEO, security, and backup. There are also some that come with a theme.
The first result from PageSpeed Insights wasn’t that great.

- Performance score: 44 (mobile), 68 (desktop)
- LCP: 12.7 s (mobile), 3.8 s (desktop)
- TBT (there is no FID data yet): 670 ms (mobile) version, 10 ms (desktop)
- CLS: 0.02 (mobile), 0.016 (desktop)
In addition to the general low scores, the largest contentful paint was too high, and the total blocking time for mobile visitors also needed improvement. The only thing that wasn’t a problem was the cumulative layout shift.
When we look at the Opportunities and Diagnostics sections, we see that it includes many of the actions we talked about above, like eliminating render-block resources, minimizing unused code, and, most importantly, Serving images in next generation formats. There is also a hint of serving static assets with an efficient cache policy.
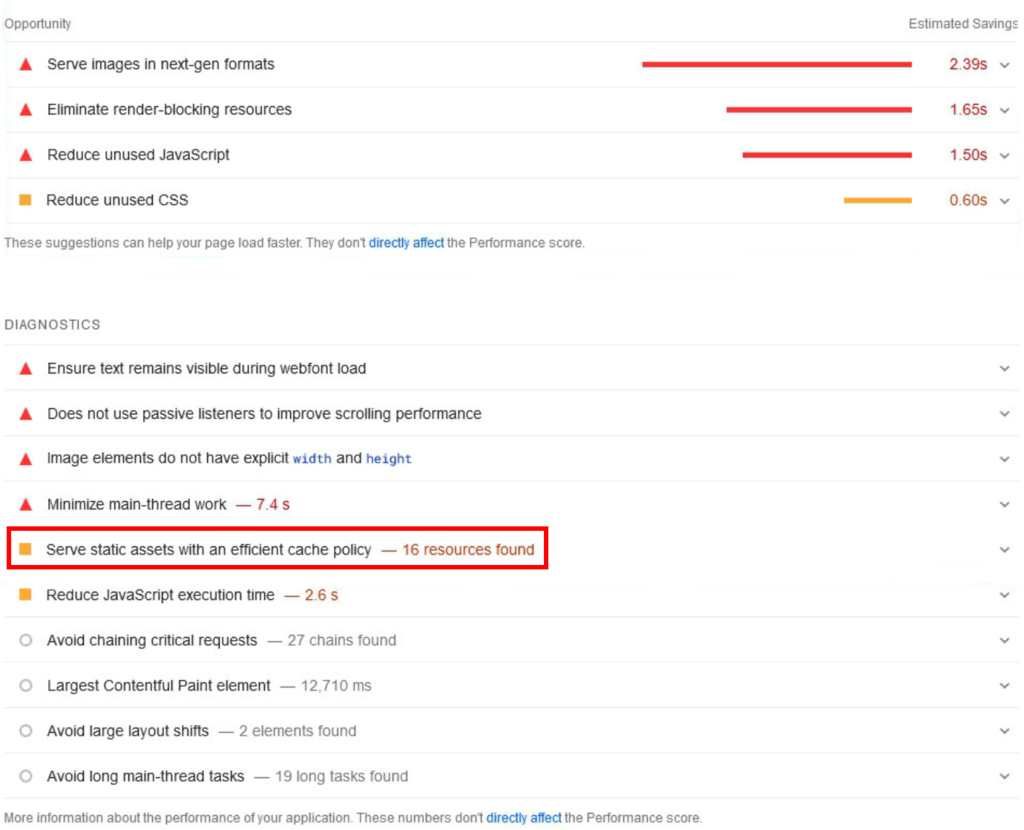
Let’s see what we can do to fix them.
WP Rocket Improvements
Once you install and activate the WP Rocket plugin, it automatically activates caching. In the plugin settings, under File Optimization, we switched on the options to minify, optimize, and defer CSS and JavaScript on the site.

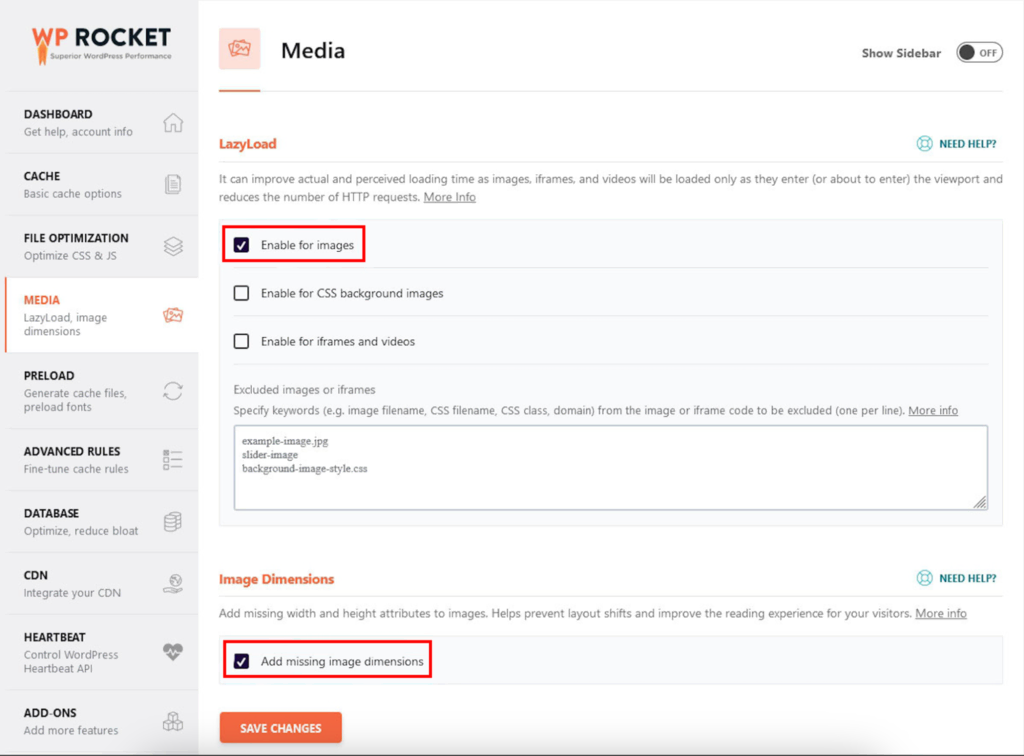
Under Media, we enabled lazy loading for images and told the plugin to add missing image dimensions.
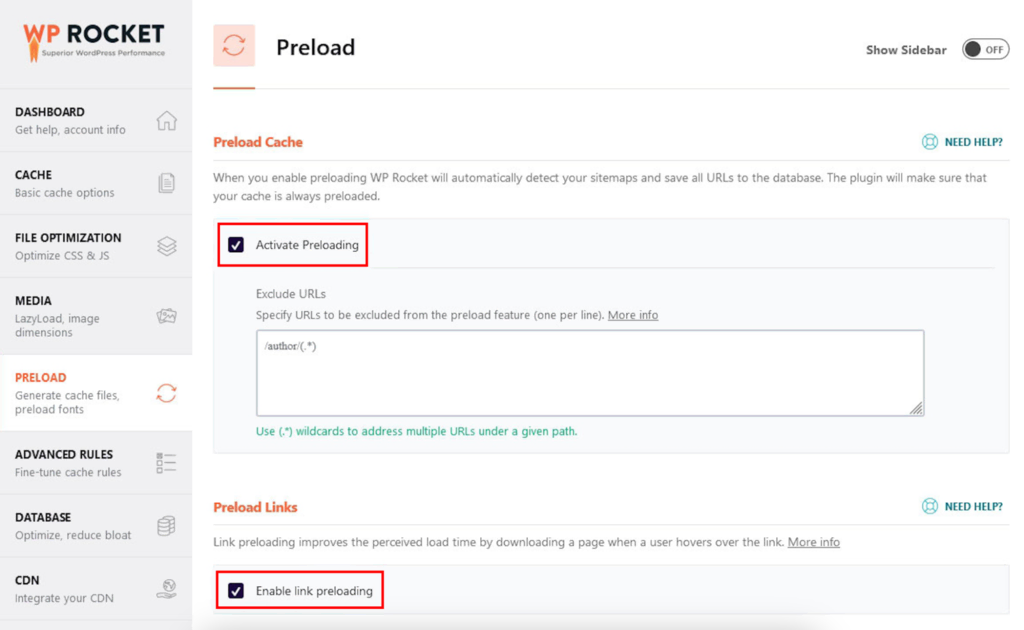
In addition, we made sure preloading is activated.
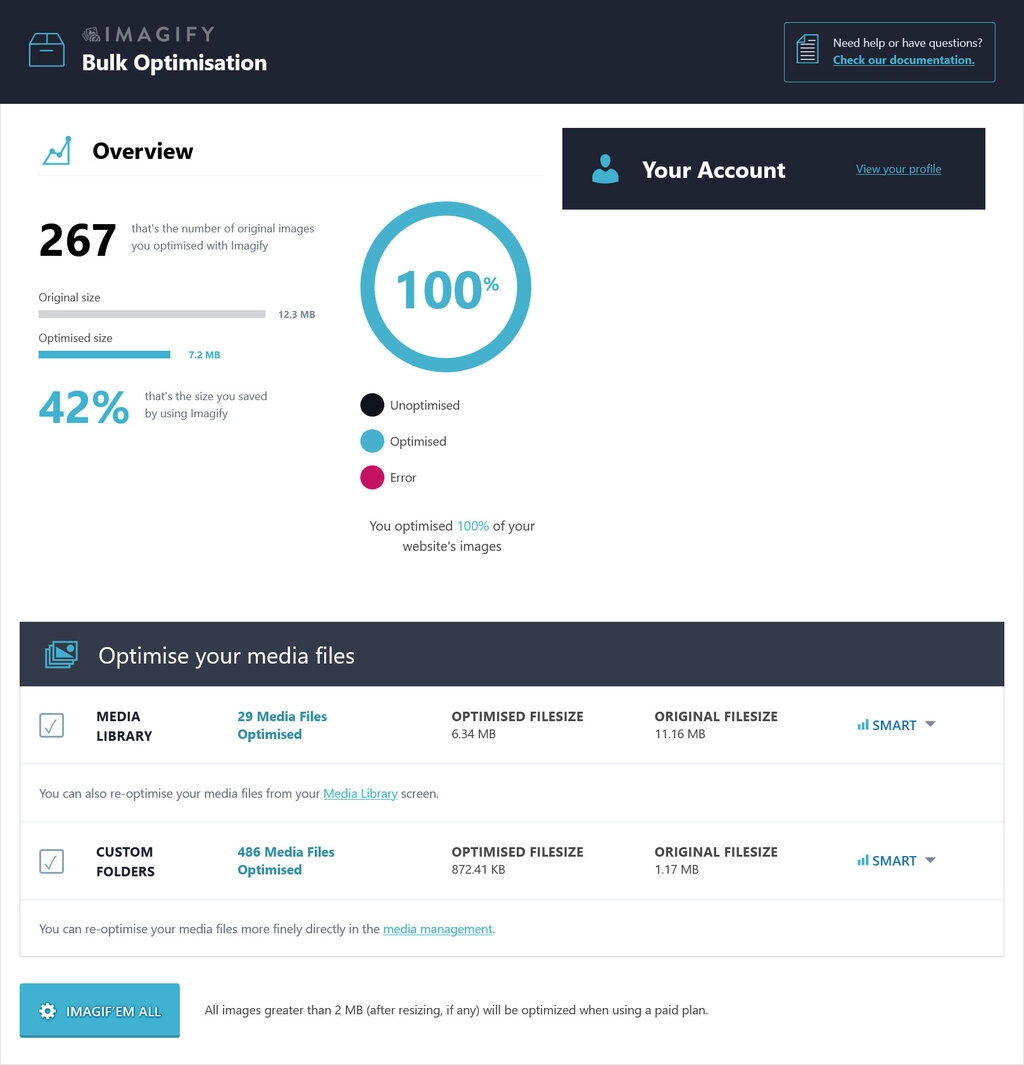
Finally, under Image Optimization, we installed Imagify – a companion plugin to WP Rocket. To further improve speed, we ran all media on the test website through its bulk optimizer.
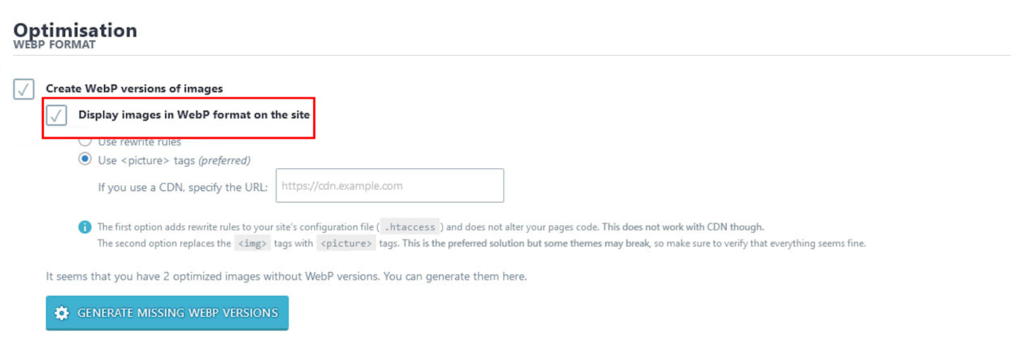
Apart from compressing the images, it also converted them to WebP format. We also turned on the option to display them in that format on the site.
Besides the above, we also could have used these options WP Rocket offers:
- Prefetch DNS requests.
- Preload fonts.
- Clean up the website and database (not necessary on a new website).
- Connect to a CDN.
However, for the sake of this case study, we thought the above was enough.
Let’s find out if it was.
Optimization Results
After making the above changes and configuring the caching plugin, we tested the website again. Here are the results:

To make it easier to understand, check out the table below:
| Before | After | Change | |
| Performance score (mobile) | 44 | 69 | +25 |
| Performance score (desktop) | 68 | 97 | +29 |
| Largest Contentful Paint (mobile) | 12.7 s | 4.7 s | -8 s |
| Largest Contentful Paint (desktop) | 3.8s | 1.0s | -2.8 s |
| Total Blocking Time (mobile) | 670 ms | 130 ms | -540 ms |
| Total Blocking Time (desktop) | 10 ms | 10 ms | +/-0 |
The Opportunities and Diagnostics sections also look much better, with most of the earlier recommendations gone or their number significantly improved.

Although there is still room for further optimization, we need to delve more deeply into the page structure and code. Considering the fact that it only took a few minutes and a few clicks to implement these changes, the results are already pretty good.
Furthermore, they will have long-term positive results on the user experience and ranking potential of this website.
Conclusion
Taking care of your core web vitals improves your website’s quality, user experience, and search engine optimization (SEO). Simply put, you should definitely take it seriously.
Hopefully, this topic is no longer intimidating for you. Once you understand the different metrics and what factors affect them, it’s just a matter of a few clicks. If some of that seems too technical, you can use a plugin like WP Rocket to do it for you.
While website performance and user experience are enduring topics that need to be revisited from time to time, optimizing your site for core web vitals is a great start.