
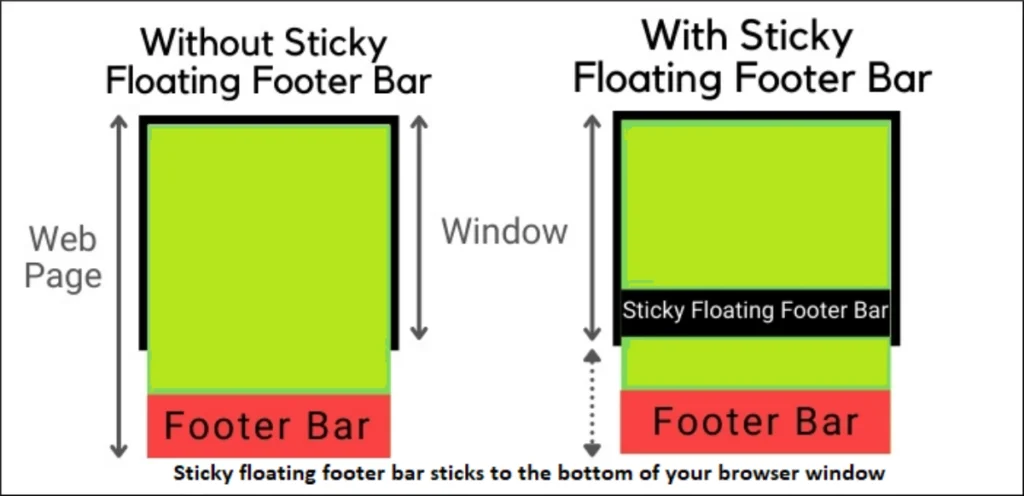
How to Add a Sticky Mobile Footer Ad in GeneratePress. A sticky footer is a website element that remains fixed at the bottom of the viewport even as the user scrolls down the page. This can be useful for providing users with quick access to important information or navigation options, such as contact details, social media links, or a call to action.
Sticky footer is a CSS layout technique that involves fixing the footer element of a webpage to the bottom of the viewport, regardless of how much the user scrolls. This creates a persistent footer that remains visible even as the user scrolls through the content of the page.
How to create a sticky footer?
Creating a sticky footer typically involves using CSS code to position the element at the bottom of the viewport and fix its position during scrolling. Several frameworks and libraries can simplify the process.
Adding a Sticky Mobile Footer to GeneratePress in 2025 (without requiring premium!)
A sticky mobile footer can be a great way to keep visitors engaged and access key information while browsing your GeneratePress site on their phones. Here’s how to achieve it without needing GeneratePress Premium:
1. Create a Block Element for your Footer Content:
- Go to Appearance > Elements in your WordPress dashboard.
- Click Add New and choose Block Element as the type.
- Design your footer content using the GeneratePress block editor. You can add icons, buttons, text, or any other desired elements.
- In the Advanced tab, assign a unique CSS class like
mobile-sticky-footerto this Block Element.
2. Make it Sticky with Custom CSS:
- Navigate to Appearance > Additional CSS.
- Paste the following code, replacing
mobile-sticky-footerwith your chosen class:
CSS
.mobile-sticky-footer {
  position: fixed;
  bottom: 0;
  left: 0;
  width: 100%;
  z-index: 100; /* Adjust if needed to ensure your footer stays on top */
}
@media (min-width: 768px) { /* Hide on desktop and tablets */
  .mobile-sticky-footer {
    display: none;
  }
}
3. (Optional) Prevent Overlap with Existing Content:
- If your sticky footer overlaps existing content, add this code to your Additional CSS:
CSS
body {
margin-bottom: [Height of your sticky footer]; /* Adjust based on your footer height */
}
@media (min-width: 768px) { /* Remove margin on desktop and tablets */
body {
margin-bottom: 0;
}
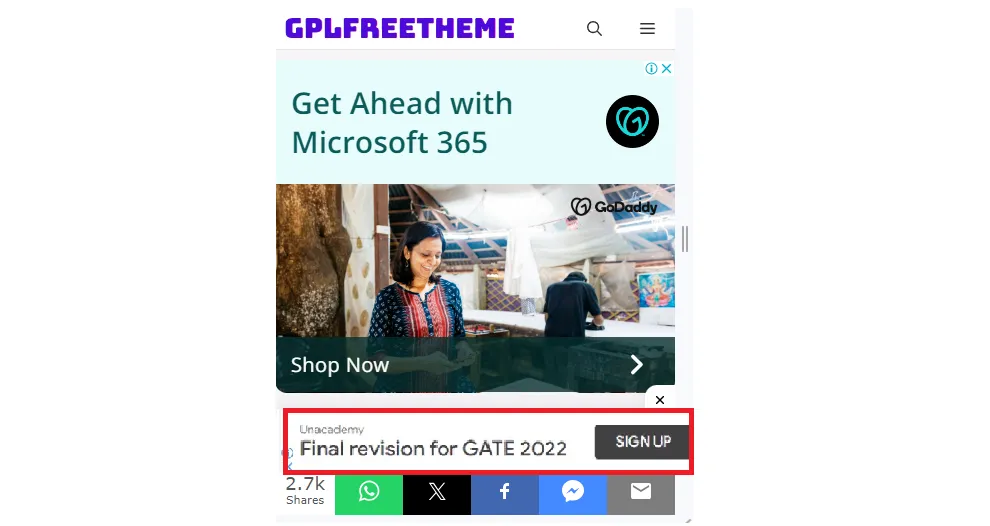
}What Does a Sticky Mobile Footer Ad Look Like in GeneratePress?
Sticky mobile footer ads in GeneratePress generally come in two main flavors:
- Banner ads: These are rectangular ads that become stationary at the bottom of the screen as users scroll through your mobile content. They often blend seamlessly with the footer design by using similar colors and fonts.
- Call to Action Bars: These ads are more prominent and interactive, often containing a button or call to action (CTA) that encourages users to click. They may also include additional elements such as text or icons.
Here are some additional things to keep in mind about sticky mobile footer ads in GeneratePress:
- Size and placement: The size and placement of your ad will depend on your goals and the overall design of your website. You’ll want to choose a size that is noticeable but not intrusive and avoid placing the ad in a way that obscures important content.
- Responsiveness: Make sure your ad is responsive and adjusts to different screen sizes and devices.
- Color scheme: Choose a color scheme that matches your website design and isn’t too jarring.
- Performance: Consider the impact of your ad on page loading speed. Large or poorly optimized ads can slow down your website and harm the user experience.
The screenshot shows the results of following this guide. Keep in mind, that all of this can be done using GeneratePress Elements only and no additional plugins. I keep finding more and more reasons to like this topic.
Building a Sticky Footer in GeneratePress with Block Elements (with Illustrations!)
Adding a sticky footer to your GeneratePress website can enhance user experience and engagement, especially on mobile devices. Thankfully, the powerful Block Element feature makes it surprisingly easy to achieve this effect.
Here’s how to create a sticky footer in GeneratePress using Block Elements:
1. Design your footer content:
Start by planning the elements you want in your sticky footer. This could include social media icons, a newsletter signup form, a call-to-action button, or simply branding information.
2. Create a new Block Element:
Navigate to Appearance > Elements in your WordPress dashboard and click Add New.
3. Choose “Hook” as the Block Element type:
In the Block Type section, select Hook and choose the after_footer hook from the dropdown menu. This ensures your element appears directly after the default GeneratePress footer.
4. Build your footer content:
Use the GeneratePress block editor to add the desired elements to your Block Element. You can utilize various blocks like Buttons, Icons, Paragraphs, and Images to create your preferred layout.
5. Apply sticky positioning (Optional):
While GeneratePress doesn’t offer a built-in sticky option for Block Elements, you can easily achieve this effect with some custom CSS. Add the following code to your Appearance > Additional CSS section:
.your-block-element-class {
  position: fixed;
  bottom: 0;
  left: 0;
  width: 100%;
  z-index: 100;
}
Remember to replace “your-block-element-class” with the actual CSS class assigned to your Block Element in the editor.
6. Adjust styles and responsiveness:
Use the block editor’s styling options and additional CSS to customize the appearance and responsiveness of your sticky footer. Play with colors, fonts, padding, and margins to achieve the perfect look and feel.
Positioning Your Sticky Footer Ad
We’ve linked your custom block to the generate_after_footer hook, ensuring it initially appears at the website’s bottom. However, we’ll make it sticky, meaning it will follow users as they scroll, remaining fixed at the bottom of their screen.
While the generate_after_footer hook, provides a great starting point, GeneratePress offers flexibility in ad placement. You can utilize various hook options in the “Placement” field to position your ad elsewhere, such as within the sidebar or even after the header.
Furthermore, you can choose to exclude the ad from specific pages or posts. This is handy if you only want it to appear on your blog content, for instance. Simply check the “Exclude” checkbox and select the desired pages/posts.
By leveraging these placement and exclusion options, you can tailor your sticky footer ad’s location and visibility to perfectly suit your website’s needs and visitor experience.
Remember, you can adjust the specific wording and image choices to match your preferred style and website theme. I hope this revised version offers a clearer and more visually engaging explanation!
Styling Your Sticky Footer Ad with GeneratePress Classes
We’ve reached the exciting stage: making your sticky footer ad visually appealing!
Since you’re using a Block Element, you’re right – GeneratePress handles default styling like color, padding, and margins. We just need to focus on achieving that sticky behavior.
1. Adding the “sticky-footer” Class:
Here’s where the magic happens! In your Block Element settings, locate the “Advanced” tab and add the “sticky-footer” class to the “Additional CSS Class(es)” field. This simple step tells GeneratePress to activate the sticky positioning for your ad.
2. Optional: Tailoring Stickiness with Custom CSS:
While the “sticky-footer” class gets the job done, you can fine-tune the stickiness further using custom CSS in the Appearance > Additional CSS section. Here’s an example:
.sticky-footer {
  position: fixed;
  bottom: 0;
  left: 0;
  width: 100%;
  z-index: 100; /* Adjust z-index to ensure your ad stays on top */
}
This code ensures your ad stays fixed to the bottom of the screen on scroll. Feel free to play with margins, padding, and background colors to personalize the look and feel.
3. Targeting Different Devices with Visibility Classes:
GeneratePress offers handy built-in classes to control element visibility on various devices. You’ve already utilized the “hide-on-desktop” class to hide the ad on desktop screens. Here’s a quick breakdown of the available options:
- hide-on-desktop: Hides the element on desktop screens (larger than 1200px)
- hide-on-tablet: Hides the element on tablet screens (between 900px and 1200px)
- hide-on-mobile: Hides the element on mobile screens (less than 900px)
Combining these classes allows for precise control over ad visibility. For instance, you could add both “hide-on-desktop” and “hide-on-tablet” to show the ad only on mobile devices.
Making Your Footer Block Sticky with CSS
Creating a sticky footer for your GeneratePress website using CSS is a great way to add call-to-actions or valuable information that remains readily accessible to your visitors. Here’s how to achieve it:
1. Add the Sticky CSS:
Navigate to Appearance > Customize in your WordPress dashboard. Click on Additional CSS and paste the following code:
.sticky-footer {
  position: fixed;
  right: 0;
  bottom: 0;
  left: 0;
}
This code defines a class called sticky-footer and applies fixed positioning to it, ensuring the element sticks to the bottom of the screen.
2. Apply the Class to Your Footer Block:
Open the Block Element you created for your footer content and navigate to the Advanced tab. In the Additional CSS Class(es) field, enter sticky-footer. This tells GeneratePress to apply the defined styling to your footer block.
3. Prevent Overlap with Existing Content (Optional):
While the sticky footer functionality is achieved, it might overlap your existing footer content on smaller screens. To address this, add the following media queries to your Additional CSS:
@media (max-width: 768px) {
  body {
    margin-bottom: 60px; /* Adjust height to match your footer block */
  }
}

@media (min-width: 769px) and (max-width: 1024px) {
  body {
    margin-bottom: 90px; /* Adjust height to match your footer block */
  }
}
These media queries add a margin to your body based on screen size, ensuring enough space for the sticky footer without overlapping existing content. Remember to adjust the margin size (60px and 90px in this example) to match the height of your footer block.
Frequently Asked Questions (FAQ)
What is a sticky mobile footer ad?
A sticky mobile footer ad is a type of advertisement that remains visible at the bottom of a mobile webpage even as the user scrolls down.
Why would I want to add a sticky mobile footer ad?
Adding a sticky mobile footer ad can help increase ad visibility and potentially generate more clicks and revenue.
How can I add a sticky mobile footer ad in GeneratePress?
To add a sticky mobile footer ad in GeneratePress, you will need to use a plugin or custom code. One popular option is the ‘Sticky Footer Ads for Google AdSense’ plugin.
Can I add any type of ad to the sticky mobile footer?
Yes, you can add any type of ad code, including Google AdSense, to the sticky mobile footer.
Do I need any coding knowledge to add a sticky mobile footer ad?
It depends on the method you choose to add the ad. If you use a plugin, no coding knowledge is necessary. However, if you choose to add the ad code manually, some coding knowledge may be required.
Can I customize the appearance of the sticky mobile footer ad?
Yes, you can use CSS code to customize the appearance of the ad, such as changing the size, color, or placement on the page.
Will the sticky mobile footer ad affect my website’s performance?
It is possible that the ad could slightly slow down the loading speed of your site. However, using a lightweight plugin or optimizing the ad code can help minimize any impact on performance.
Can I choose which pages or posts the sticky mobile footer ad appears on?
Yes, most plugins or custom code options will allow you to select specific pages or posts where you want the ad to appear.
Are there any best practices for using a sticky mobile footer ad?
It is important to use the ad sparingly and not overwhelm your readers with too many ads. It is also recommended to test the ad placement and design to see what works best for your audience.