
In this tutorial, we are going to create the ultimate widget sticky in the GeneratePress theme using the plugin and without a plugin.
The sidebar is one of the essential parts of a blog. Using various widgets in the sidebar can make your website attractive. The sidebar helps in increasing the click-through rate (CTR) of the website.
Here we will learn to make the last widget sticky like in our WordPress blog. You can scroll down this blog post and check the right sidebar.
There are two methods we are going to use to make widgets sticky in GeneratePress themes.
- Making the final widget sticky using the plugin.
- Making the Ultimate Widget Sticky Without Plugins.
On WordPress, we can use floating or sticky widgets in many ways. If you have long blog posts, without the sticky widget, your right sidebar will remain empty when scrolling through posts. So it is better to have a floating widget.
Additionally, you can use sticky widgets on your site for the following purposes.
- Show popular posts.
- Display selected posts.
- Embed chat box.
- Embed the Subscriber widget.
- Display associated banners.
- Show the latest posts.
- Social sharing icons.
- Advertisement box.
- Coupon Code.
- Stick or float any widget.
Make the final widget sticky in GeneratePress using a plugin
Fixed widget plugins are a popular and widely used technique for making your sidebar sticky. For this, you need to install the Q2W3 Fixed Widget plugin. You can also use the Q2w3 WordPress plugin in other WordPress themes.
Let’s install and implement it in the GeneratePress theme.
- Go to Plugins > Add New
- Q2W3 Find Fixed Widget Plugin.
- Install and activate it.
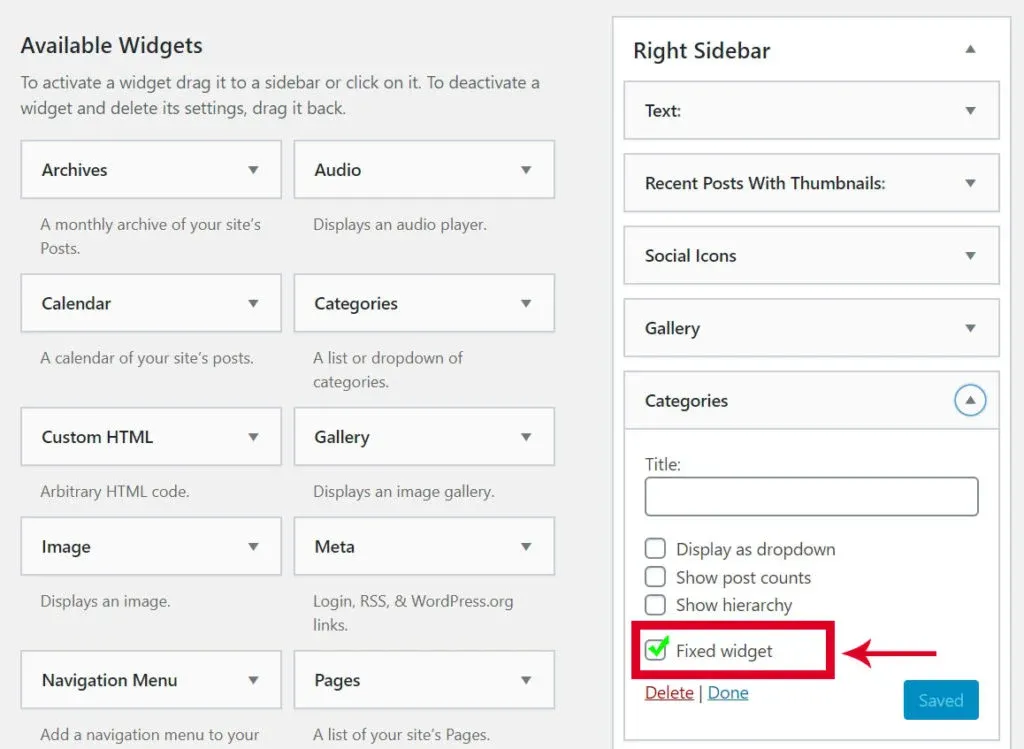
- Go to Appearance > Widgets.
- Go to the right sidebar.
- Select Last Widgets and you will see the Fixed Widgets option.
- Check the Fixed widget option to make it sticky. (Follow the above screenshot)
- Press the Save button.
- Also, go to Appearance > Fixed Widgets option
- Adjust widget settings according to your theme needs.

Make the last widget sticky in GeneratePress without the plugin
It’s easy to make the Last widget sticky in GeneratePress using CSS code. It’s a lightweight approach and a little CSS code works like a charm.
Let’s make the final widget sticky using CSS code in the GeneratePress theme. Note that the code is for a blog with a right sidebar. Adjust the code if you are using the left sidebar.
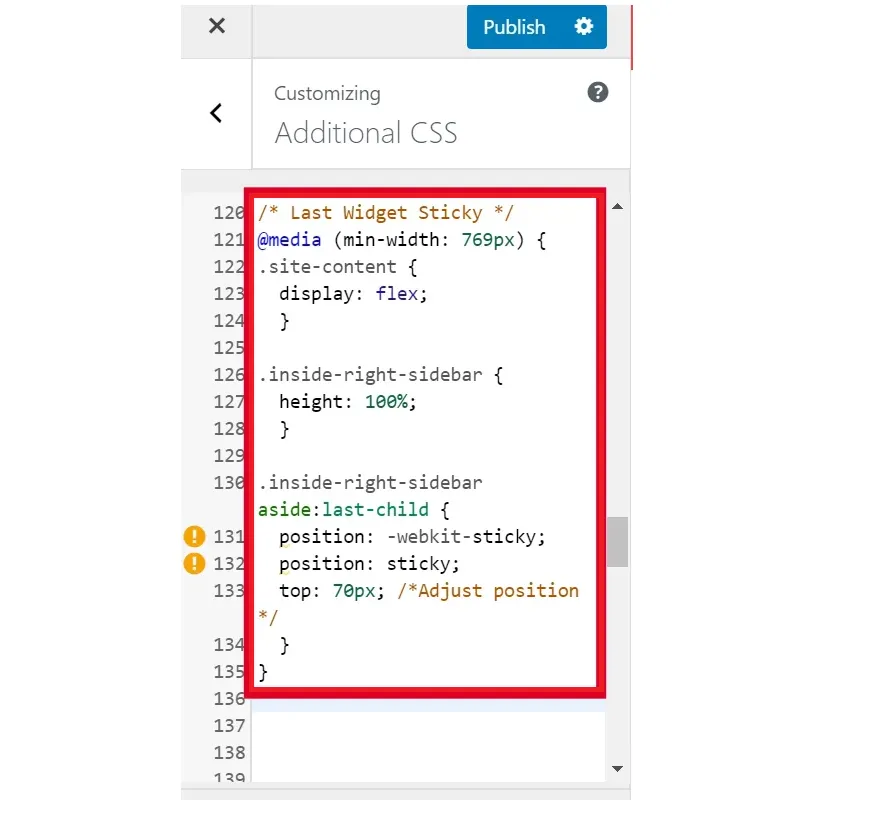
- Go to Appearance > Customize > Additional CSS.
- Copy and paste the CSS code.
- Adjust the value in the top CSS property if necessary.
- Press the Publish button.
@media (min-width: 769px) {
.site-content {
  display: flex;
	}

.inside-right-sidebar {
  height: 100%;
	}

.inside-right-sidebar aside:last-child {
	position: -webkit-sticky;
	position: sticky;
	top: 70px; /*Adjust position */
  }
}
Conclusion
So which method are you going to try?
If you are unfamiliar with the code, you can use the Q2W3 Fixed Widgets plugin. There are lots of plugins besides Q2W3 in the WP repository for creating sticky widgets, and you can try any of them and let me know in the comments section.
I used the CSS code in my gplfreetheme.com blog, as you can see in the last widget in the right sidebar.
Finally, I would like to thank you for reading the complete tutorial to make the final widget sticky in the GeneratePress theme.
Frequently Asked Questions (FAQ)
What is a sticky widget?
A sticky widget is a widget that stays in a fixed position on a webpage, even when the user scrolls down the page.
Why would I want to create a last widget sticky in the GeneratePress theme?
Creating a last widget sticky can help make your website more user-friendly and improve the overall user experience. It allows important information or navigation links to be easily accessible to users at all times.
How do I create a last widget sticky in the GeneratePress theme?
To create a last widget sticky in the GeneratePress theme, you will need to use a plugin called ‘Sticky Widget’ or manually add CSS code to your theme’s stylesheet.
Can you explain the steps to create a last widget sticky using the ‘Sticky Widget’ plugin?
Sure, first install and activate the ‘Sticky Widget’ plugin. Then, go to Appearance > Widgets and click on the widget you want to make sticky. In the widget settings, check the box next to ‘Make this widget sticky’. Save your changes and the widget will now stay in a fixed position on your webpage.
What if I want to manually add CSS code to make my last widget sticky?
If you prefer to manually add CSS code, go to Appearance > Customize > Additional CSS. Then, add the following code:.widget.sticky {position: fixed; bottom: 0;}. Save your changes and your last widget will now be sticky.
Can I make multiple widgets sticky using these methods?
Yes, you can make multiple widgets sticky by either using the ‘Sticky Widget’ plugin or manually adding CSS code to each widget.
Will the last widget sticky work on all devices?
Yes, the last widget sticky will work on all devices, including desktop, tablet, and mobile.
Is it possible to make a specific widget sticky on certain pages only?
Yes, you can use the ‘Sticky Widget’ plugin to make a specific widget sticky on certain pages by using the plugin’s widget visibility settings. You can also use CSS code to make a specific widget sticky on certain pages by adding a class or ID to the widget and targeting it with the CSS code.