
If you are using the GenerateBlocks plugin, you can easily make entire blocks clickable in the GeneratePress theme.
Here, we will show how you can make your WordPress blocks clickable in any theme.
But first, let’s try it in the GP Premium theme. You can easily apply this method to any WordPress theme using the GenerateBlocks WordPress plugin.
Also, if you are a new user of the GeneratePress and GenerateBlocks world, add the GenerateBlocks plugin for free from the WordPress repository.
More Post: How To Make Last Widget Sticky In GeneratePress Theme [2024]
In this guide, you are going to learn how entire block clickable in generatePress
- Make the entire block clickable using the GenerateBlock free plugin.
- Make the entire block clickable using the GenerateBlocks Pro plugin.
- Using CSS code to make a block clickable.
If you are interested in other GeneratePress and GenerateBlock tutorials, you can check out our dedicated categories. Also, read these similar posts.
For GeneratePress Premium:
- Utilize the Container Block: Add a Container Block where you want the clickable area.
- Enable Container Link: In the Container Block settings, locate the “Container Link” option and activate it.
- Set Link Destination: Choose the page or URL you want the block to link to.
- Customize (Optional): You can adjust padding, margins, and another styling within the Container Block settings.
For GeneratePress Free:
- Leverage CSS (Manual Method):
- Add Clickable Class: Create a new CSS class with desired clickability styles (e.g., cursor: pointer) in your theme’s stylesheet or a custom CSS plugin.
- Target Block Class: Identify the CSS class of the block you want to make clickable using your theme’s documentation or browser developer tools. Apply your clickable class to that specific block class using CSS selectors.
- Attach Click Event (Optional): Use JavaScript or jQuery to add a click event to the targeted block class, redirecting users to your desired URL.
- Utilize GenerateBlocks Pro Plugin (Recommended):
- Install and Activate: Get the GenerateBlocks Pro plugin and activate it on your WordPress site.
- Add Container Block: Similar to the Premium method, add a Container Block where you want the clickable area.
- Enable Container Link: In the Container Block settings, activate the “Container Link” option.
- Set Link Destination: Choose the page or URL you want the block to link to.
- Enjoy Flexibility: The Pro plugin offers more customization options for your clickable blocks.
1. Make the entire block clickable using the GenerateBlocks free plugin.
To make the block clickable in the free method, you have to use CSS code.
Add Custom Clickable CSS Code
- First, go to your dashboard.
- Go to Appearance > Customize.
- Now, go to additional CSS.
- Copy and paste the code below and publish.
.gb-container.clickable-container .gb-inside-container {
    position: fixed;
}

.gb-container.clickable-container a:before {
    content: '';
    position: absolute;
    top: 0;
    right: 0;
    bottom: 0;
    left: 0;
    z-index: 999;
}
Add Clickable Class to your Block
Now, it’s time to add the block to your posts/pages.
- For example, let’s add a GenerateBlocks query loop block.
- After adding the query loop block, select the post template block as per the screenshot.
- Go to Advanced Block Settings and paste the clickable container CSS class name into the Additional CSS Classes box.
2. Make the entire block clickable using the GenerateBlocks Pro plugin.
If you are using the GenerateBlock Pro version, you can make the entire block clickable with just 3 to 4 clicks. You don’t need to use the CSS method, as the Pro version manages all those settings.
So, how to make our block clickable?
Follow these steps and let me know how it goes from your side.
Entire Block Clickable in GeneratePress: Get GenerateBlocks Plugin
Here I am using the query loop by GenerateBlocks (not the default).
Add query loop block
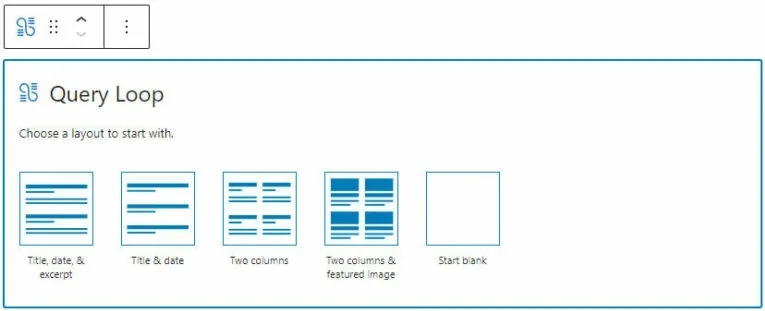
First, add the query loop block, for example, I am selecting two columns and the featured image layout.
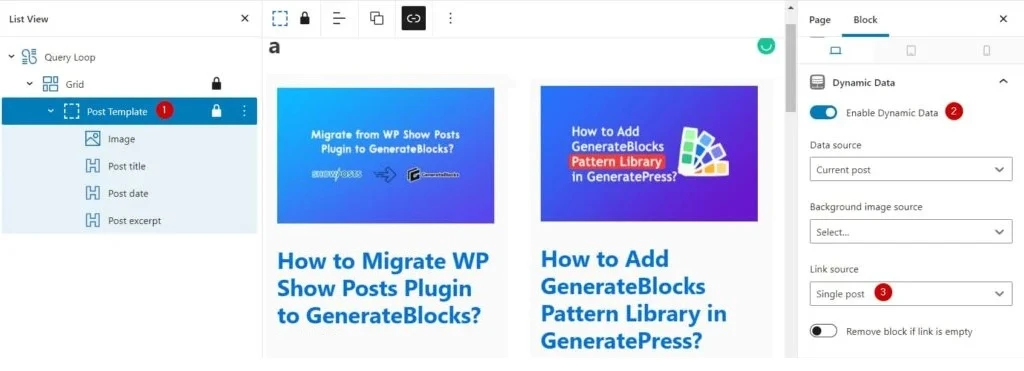
Make post template clickable
Now, it’s time to make your post template clickable.
- Like the screenshot above, choose Query Loop > Post Template Block.
- Go to Block Settings.
- Go to Dynamic Data.
- Enable dynamic data option.
- Now, you will see the Data Source, Background Image Source, and Link Source settings.
- Go to Link Source settings and select Single Post.
- Finally, preview your design and check the clickable part, you will be able to click the entire block.
How do I make a clickable block on WordPress?
Using the built-in linking feature:
This is the simplest method and works for most block types.
- Add your block: Place the desired block (text, image, button, etc.) onto your page or post.
- Select the block: Click on the block to activate it.
- Add the link: Look for the link icon in the block toolbar or settings panel. Depending on your theme and editor version, it might be a chain symbol, a hyperlink icon, or a text field labeled “Link”.
- Paste your URL: Enter the web address you want the block to link to. You can also link to another page or post within your WordPress site.
- Click “Apply” or “Update”: Save your changes.
Using CSS classes:
This method offers more flexibility and customization but requires some basic understanding of CSS.
- Identify the block class: Check your theme’s documentation or use browser developer tools to find the CSS class of the block you want to make clickable.
- Add a clickable class: In your theme’s stylesheet or a custom CSS plugin, add a new class with the desired styling (e.g., cursor: pointer).
- Target the block class: Use CSS selectors to apply the clickable class to the specific block class you identified.
- Add the link behavior: Use JavaScript or jQuery to attach a click event to the targeted block class, redirecting users to your desired URL.
Using plugins:
Several plugins like “Easy Links” or “Clicky Blocks” offer a user-friendly interface to create clickable blocks without coding. These plugins often come with additional features like link tracking and analytics.
Conclusion
Making an entire block clickable in GeneratePress is very easy with GenerateBlock.
Just follow a few steps, and you can make any WordPress theme’s blocks clickable. Clickable blocks are a great way to add interactivity to your website.
They can be used to link to other pages on your site or to external websites. With GenerateBlock, you can easily add clickable buttons to any block.
That’s all there is to it!
More Post:
- How To Add A Sticky Mobile Footer Ad In GeneratePress (2024)
- How To Switch Your WordPress Theme To GeneratePress In 2024
- How To Create A Sticky Floating Sidebar In Astra Theme (2024 Tutorial)
- How To Make Sidebar Sticky In Kadence Theme? [2024]
- How To Create A Sticky Floating Footer Bar In GeneratePress [2024]
Frequently Asked Questions (FAQ)
What is GeneratePress?
GeneratePress is a lightweight and highly customizable WordPress theme.
Why make an entire block clickable?
Improve user experience by directing users to specific sections, showcasing CTAs, or creating interactive elements.
How to make a block clickable?
1. GenerateBlocks Pro (recommended):
Use the “Container Block” and add its link in Block Settings.
2. CSS classes:
Add a CSS class to the block (e.g., .clickable-block).
Use CSS to style the block and make it clickable (e.g., with cursor: pointer).
3. Advanced (CSS pseudo-elements):
Use :before or :after to create invisible clickable overlays.
Coding knowledge needed?
Basic CSS understanding is helpful for methods 2 and 3.
Are multiple blocks clickable?
Yes, use unique IDs or classes for each block and apply the chosen method.
Benefits of clickable blocks?
Improved user engagement, easier navigation, and higher click-through rates.
Design impact?
Minimal if using GenerateBlocks Pro or careful CSS.