
Setting up your Unturned server in 2025 can be a rewarding experience, allowing you and your friends to customize and play the game the way you want. Here’s a guide to get you started:
Unturned is a multiplayer survival game where players navigate through a zombie-infested world, craft items, build shelters, and fight zombies and other players to survive. Setting up your server is a great idea to improve your gaming experience.
This article will help you set up an unturned server on a Linux Virtual Private Server (VPS). Whether you’re an expert or new to internet hosting, our step-by-step instructions will make it easy to create your Unturned server.
Unturned Server Prerequisites
Gather these essential components before creating an Unturned game server to ensure a smooth and successful installation:
- Operating System: Windows, Linux, or macOS. For this tutorial, we will focus on Linux for easy setup and increased efficiency.
- CPU: At least a quad-core processor.
- RAM: 4GB or more to host more players.
- Storage: Minimum 10 GB.
How to Make an Unturned Server
From choosing the best VPS provider to launching your server, this section will guide you in creating an unturned server hosting environment.
1. Choose a VPS Provider
Selecting the appropriate Linux VPS for your Unturned server ensures a stable and responsive gaming environment.
Hostinger’s Minecraft hosting plans are an excellent choice for your unturned server hosting needs. Supporting popular games like Minecraft, Counter-Strike 2, Rust, and Unturned, these plans offer several benefits, including:
- High-Performance Hardware – Our Minecraft VPS plans to utilize Intel Xeon processors and SSD storage, ensuring a fast and reliable unturned server.
- Multiple Server Locations ensure low latency for your players, optimizing the unturned gaming experience.
- Customization and Control – Full root access allows you to tailor the server to your preferences.
- Affordable Plans – With plans starting at just $6.99/month, our plans are budget-friendly and scalable as your servers grow.
To get Hostinger’s Minecraft VPS, follow these steps:
- Visit our Minecraft VPS page and choose a plan that suits your server’s needs.
- Add your selected plan to your cart and complete the checkout process.
- After purchasing, navigate to VPS and click Setup. Name your server, set its password, and select your data center location.
2. Configure the Virtual Private Server
Configuring your VPS is a key step in setting up a publicly accessible Internet server for your Unturned games, enabling the hosting of private or public servers.
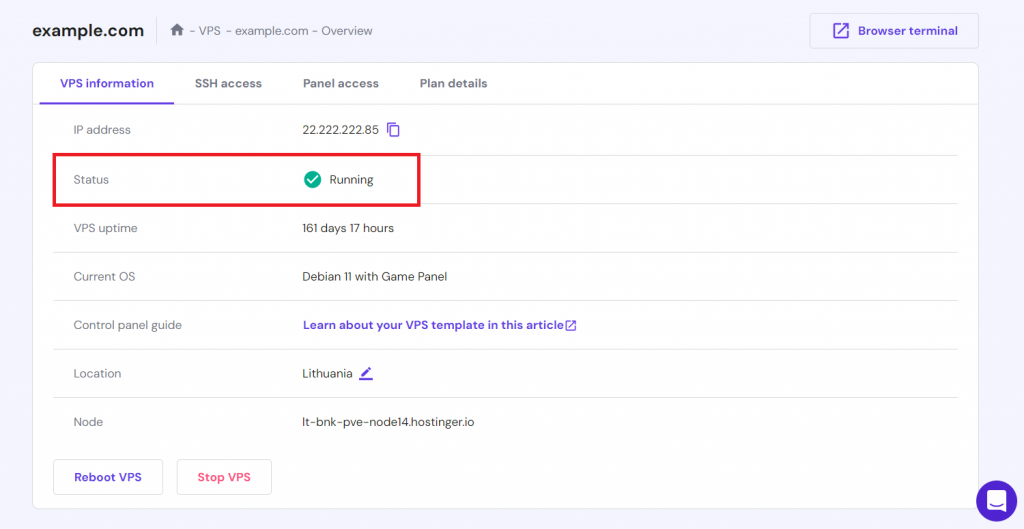
For Hostinger customers, this starts by logging into your Hostinger account. Then, go to the VPS dashboard and check the status of your VPS. It should be set to running. If not, start it with one click.
Next, proceed to the SSH Access tab. Here, you will find important details to access your server via SSH commands.
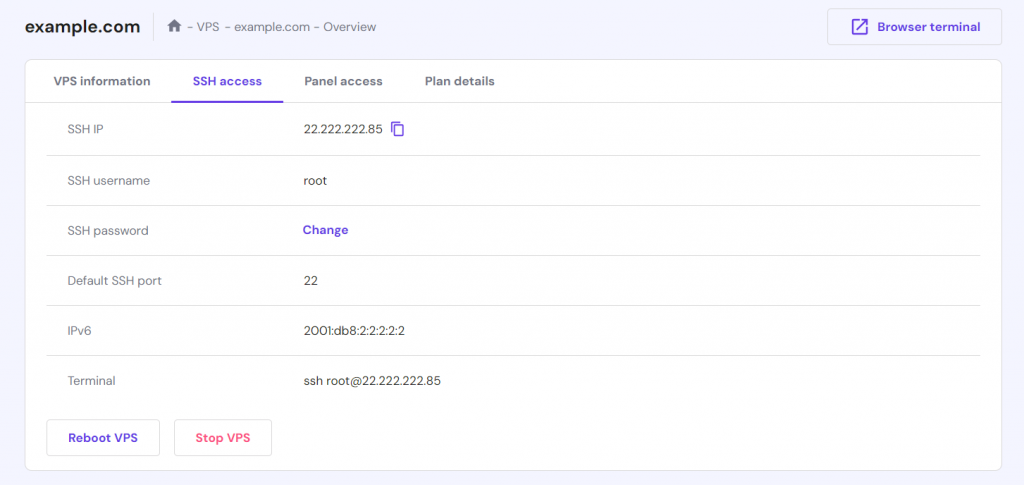
Once you have recovered your credentials, log in to your server using an SSH client like PuTTY on your computer.
Then, update and upgrade your system to the latest features and security patches with the following Linux commands: sudo apt-get update sudo apt-get upgrade
If you are updating for the first time, add the i386 architecture to ensure compatibility with specific Unturned server dependencies: sudo dpkg –add-architecture i386
Continue by installing the necessary libraries, each serving a specific purpose:
- Screen – Keeps processes running even after the terminal is closed.
- htop – An interactive process viewer for monitoring your server performance.
- Unzip and WGet – tools for downloading and extracting files.
- Mono – A software platform required to run .NET applications (such as Unturned) on Linux.
Execute the following commands sequentially: sudo apt-get install screen htop unzip wget sudo apt-get install build-essential gcc-multilib libstdc++6:i386 libgcc1:i386 libncurses5:i386 rpm zlib1g:i386 sudo apt-get install libmono2.0 -sil mono-runtime sudo apt-get install libc6:i386 libgl1-mesa-glx:i386 libXrandr2:i386 libXcursor1:i386
3. Create a Steam Account
Creating a dedicated Steam account for your Unturned server management offers several benefits.
First, it keeps your personal gaming and server management activities separate, enhancing security and organization. Additionally, a dedicated account reduces the risk of your personal game data and settings being compromised.
Create a new Steam account with these steps:
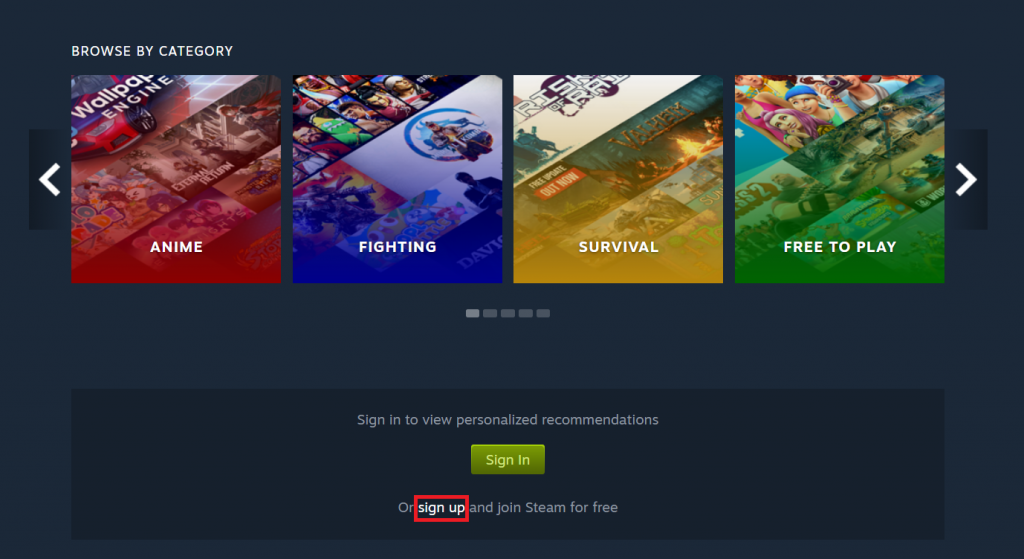
- Visit the Steam web page and click Sign up to begin the account creation process.
- On the next page, enter your email address and country of residence.
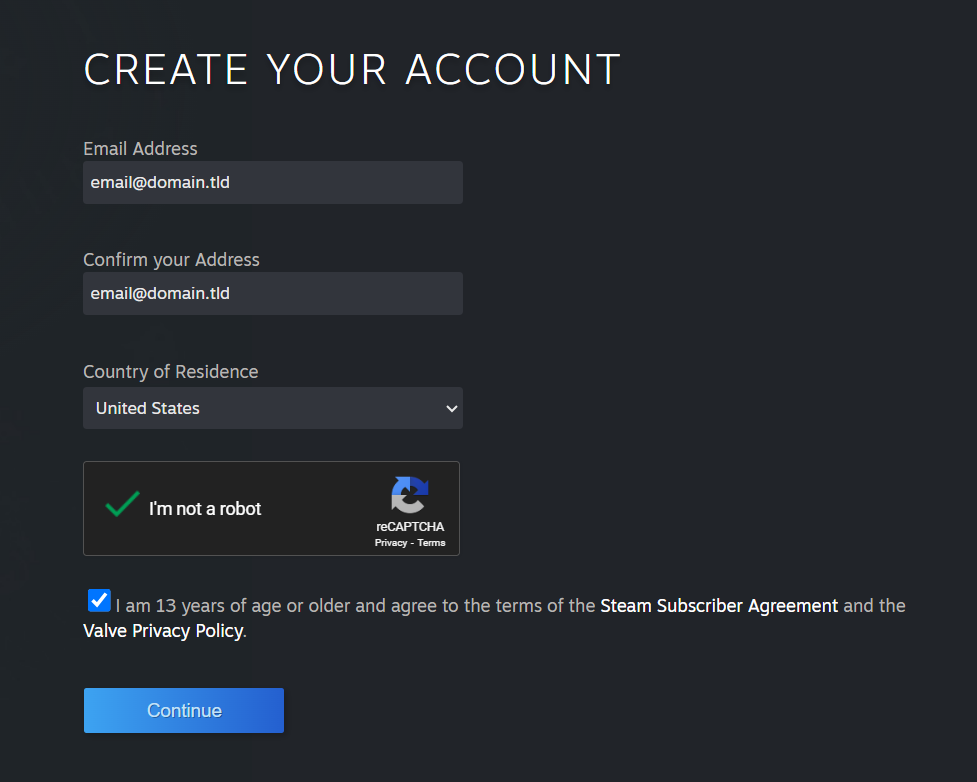
- After submitting your details, Steam will send a verification email. Follow the instructions in the email to confirm your account.
- Once your account is verified, log in to set your username and password. Remember not to use the same password anywhere else for enhanced security.
4. Install SteamCMD and Download Unturned Server Files
Before downloading the Unturned server files, it is necessary to install Wine and SteamCMD.
Wine is a compatibility layer for running Windows applications on Linux. SteamCMD is the command-line interface of the Steam client, used to install and update the Unturned dedicated server tools and other game server files.
Here are the steps:
- Install Wine by executing the following command:
sudo apt-get install wine
- Use the mkdir command to create a directory for SteamCMD. For example:
mkdir ~/steamcmd
- Download SteamCMD from the official source using:
wget
- Once downloaded, extract the files with:
tar -xvzf steamcmd_linux.tar.gz
With Wine and SteamCMD ready, proceed to download the Unturned server files.
- First, create a directory for your Unturned server files by running:
mkdir ~/unturnedserver
- Then, run this Linux navigate command to access the SteamCMD directory:
cd ~/steamcmd
- Start SteamCMD by executing:
./steamcmd.sh
- In the SteamCMD interface, log in to your Steam account or use an anonymous login with this Unturned server command:
login anonymously
Set up the installation directory and download the unturned server files:
force_install_dir ~/unturnedserver app_update 1110390 valid
5. Download and Configure RocketLauncher
After your Unturned server files are downloaded, the next step is to set up RocketLauncher. It is a server wrapper with additional functionality and customization options that enhance overall server management.
Follow the instructions below:
- Ensure you are in the directory where you installed SteamCMD. Then, use the following commands to download RocketLauncher:
cd ~/steamcmd wget
- Once the download is complete, extract RocketLauncher and remove the ZIP file:
unzip Rocket.zip && rm -rf Rocket.zip
- Move RocketLauncher and its scripts to the unturnedserver directory:
mv Scripts/Linux/RocketLauncher.exe ~/unturnedserver/ mv Scripts/Linux/*.sh ~/unturnedserver/
- If you’re planning to run a modded server with RocketMod, move the RocketMod files into the Modules directory of unturnedserver:
mv modules/rocket.unturned/ ~/unturnedserver/modules/
RocketMod offers a variety of mods and plugins, including the WorkshopDownloadConfig.json file, to enhance server customization and management.
During startup, the map command searches this workshop file for specific mods and maps, automatically integrating them into the server.
6. Edit the Update Script
The next important step is to customize the update.sh script for your Unturned server. Typically a batch script or a text document, this file automates updating server files through SteamCMD.
To open the update script with the nano editor, run the following command: nano ~/untunedserver/update.sh
Here’s a basic outline of what you might find inside the update.sh file: #!/bin/bash # Navigate to the SteamCMD directory CD ~/steamcmd # Login to Steam (‘anonymously’ or using your dedicated account ./steamcmd.sh +login [username] [password] # do not update/install ./steamcmd.sh +app_update 1110390 validate # Quit SteamCMD ./steamcmd.sh +quit
Key editable points in this script include:
- Steam Login – Replace [username] [password] with your dedicated Steam account credentials.
- Directory Path – Make sure the script correctly points to where SteamCMD is installed (in this case, ~/SteamCMD).
- App Update Command – +app_update 1110390 The validate command is important, because it specifies the app ID of the unturned server and checks for missing or corrupted files.
If you decide to input your Steam account credentials into the script, make sure the file permissions are set to restrict access. Use the chmod command to set permissions so that only the administrator (you) is allowed to view or edit this file. For example: chmod 700 ~/unturnedserver/update.sh
7. Configure the Firewall and Port Forwarding
After setting up your game server, configure a firewall and set up port forwarding to ensure that your server is accessible to players. This Unturned Server troubleshooting step is important to prevent and resolve connection issues.
Configure the Firewall
You will use UFW (Uncomplicated Firewall) to manage network traffic. First, enable UFW: sudo ufw enable
Next, allow default unturned ports. Recommended port values for incoming connections are 27015 to 27017: sudo ufw allow 27015:27017/tcp sudo ufw allow 27015:27017/udp
If your server uses different ports (as specified in your server settings or Commands.dat file), replace 27015:27017 with your server’s port range.
Set Up Port Forwarding
Port forwarding enables multiple devices to connect to your server through your router.
First, find your internal IP address by accessing Hostinger’s VPS dashboard or running ip addr in the ssh client.
Next, access your router’s settings through your web browser, usually by entering the router’s default gateway address.
Go to the Port Forwarding section and create a new rule as follows:
- Service Name – Inverted.
- Protocol – UDP (as Unturned primarily uses UDP).
- External starting port and internal starting port – The starting port of your server (e.g., 27015).
- External End Port and Internal End Port – The end port of your server (e.g., 27017).
- Internal IP Address – Your VPS IP that hosts the Unturned server.
Finally, save and apply these changes.
8. Set Configurations for the Server
Now that you’ve set up the firewall and port forwarding, it’s time to configure your server. Proper Unturned server optimization is essential to enhance the gameplay experience.
You will find several DAT files to edit with a text editor in your Unturned server directory. These configuration files include Adminlist.dat, Blacklist.dat, Commands.dat, and Whitelist.dat.
Commands.dat File Configuration
The commands.dat file allows you to set various server configurations as an Unturned Server Admin. To open Commands.dat, run:nano ~/unturnedserver/Commands.dat
Here, you can modify various setup commands to configure your server, such as:
- Name [Server Name] – Sets the name of your server.
- Password [Server Password] – Sets a password for private access.
- MaxPlayers [number] – Defines the maximum number of players allowed.
- Map [map name] – Select the map for your server. To use a player-created (workshop) map, place the workshop maps folder in the workshop directory.
- Port [port number] – specifies the port of your server (default is 27015).
- Mode [Easy/Normal/Hard] – Sets the difficulty mode.
- Owner [Steam64 ID] – Appoints the server owner, giving overall administrator commands.
- Perspective [Type] – Sets the allowed views (first, third, vehicle, both).
- PvE [True/False] – Toggles between PvP and PvE modes.
- Bind [Internal IP] – Binds your server to the internal or network adapter IP address.
- Cheats [True/False] – Disable or enable cheats on the server. Available only to server administrators.
When editing these commands, ensure each is on a separate line to maintain clarity and prevent configuration errors.
Config.json File Customization
The config.json file plays an important role in more advanced Unturned server customization. Located at {UNTURNED}\Servers(server name)\config.json, this file allows more detailed server configuration, including game rules and listing display.
When editing config.json, it is important to follow the JSON format. Edit values only after the colon (:) and within quotation marks. Here are some elements you may encounter and modify:
Browser:
- Icon – Path to the image file used as the server’s icon.
- Desc_Hint – A short description or hint that appears on hover over the server list.
- Desc_Full – Full description of your server.
Server:
- VAC_Secure – Enables or disables the Valve anti-cheat system.
- battleeye_secure – Toggles BattleEye anti-cheat.
Gameplay:
- DayNight_Cycle – Adjust the length of the day and night cycle.
- player_difficulty – Sets the default difficulty for players.
- Max_Players – Sets the maximum number of players.
The game’s options mirror the in-game Play > Singleplayer > Config menu, allowing for a familiar and intuitive setup process.
Unturned Multiplayer Server Setup
If you plan to run multiple servers or set up specific server list queries, it is necessary to fix the settings in commands.dat and config.json.
Configure different server names and port numbers in the Commands.dat file and different gameplay settings in the config.json file to provide a diverse experience on your dedicated server.
Additionally, it is important to manage multiple file IDs when configuring different settings for each server. This ensures that each server instance is assigned a unique file ID, enhancing the overall server management process.
Also, consider using Unturned Server plugins and mods to introduce new features or change game mechanics. These can be found and managed in the modules folder.
Regularly test these additions for compatibility and balance, ensuring that they contribute positively to the multiplayer server.
9. Launch Your Unturned Server
Once the Unturned server configuration is complete, it’s time to launch it and welcome players. This launch server step is important to make your server available for multiplayer gaming.
Execute Launch Commands
The order to start the Unturned server on Linux varies depending on the distribution and your administrator preferences. The basic format for running an internet server is: wine unturned.exe [options]
[Options] include various parameters for setting player limits, using workshop maps, and customizing game modes. For example wine unturned.exe -nographics -pei -normal -nosync -pve -players:16 -sv
Use screen or tmux for Detachable Sessions
To keep the server running in the background, even if you’re disconnected over SSH, use screen or tmux. Start the server with: screen -s unturnedserver wine unturned.exe -nographics -pei -normal -nosync -pve -players:16 -sv
To disconnect from the screen session and leave the server running, press Ctrl+A → D. Reattach at any time: screen -inspectorserver
Guide for Players to Join
As the owner of the host computer, you can connect to the server directly by running Unturned through Steam. Click Play → Connect, then enter localhost in the IP field.
Other players will need your server’s IP address to connect. Instruct them to select Join in Unturned’s main menu and enter the IP of your VPS to connect to your server.
Unturned Server Backup and Maintenance
Maintaining a healthy Unturned server includes regular backups and monitoring server performance. Regularly back up configuration files such as commands.dat, config.json, and the entire server directory to secure locations to prevent data loss.
Monitoring server performance, primarily CPU and memory usage, is important for optimal operation. Use a tool like Htop for real-time performance tracking.
Keeping servers and mods up to date ensures access to the latest features and security patches. Regularly review server logs and player feedback for potential issues or areas for improvement.
A scheduled maintenance period is required to apply updates and restart the server. Notify players in advance to minimize disruption.
- What Is Managed WordPress Hosting? A Beginner’s Guide
- Liquid Web Hosting 2024: Can Speed & Support Justify the Cost
- Nexcess Web Hosting January Sale: Up to 55% Off & 4 Months Free Hosting
- How to Host a Rust Server: Setting Up and Hosting Your Own Dedicated Server in 2024
- How to Deploy Laravel Project on a Virtual Private Server in 2024
Conclusion
In this guide, we’ve explored the process of setting up an Unturned private server, equipping you with the tools and knowledge needed to launch your gaming environment. Following each step, from selecting a reliable VPS to configuring server settings, is important for starting a server on Unturned.
Remember, server success often depends on regular maintenance and community support. Accept challenges and actively seek guidance for further documentation. There are many exciting survival adventures here on your first server!
Frequently Asked Questions (FAQ)
What is a dedicated game server?
A dedicated game server is a computer that is solely used to host a specific game or multiple games for players to connect and play on.
Why would someone want to set up their dedicated game server for Unturned?
Setting up a dedicated game server for Unturned allows players to have complete control over their gaming experience, including custom game settings, mods, and the ability to invite friends to play on a private server.
What are the minimum system requirements for running an Unturned server?
The minimum system requirements for running an Unturned server in 2025 are a 64-bit operating system, 4 GB of RAM, and 10 GB of available storage space.
How do I set up a dedicated game server for Unturned?
To set up a dedicated game server for Unturned, you will need to download the dedicated server files from Steam and follow the instructions provided by the game’s developer, Nelson Sexton.
Do I need to have coding or technical skills to set up an Unturned server?
While having some technical knowledge may be helpful, it is not necessary to set up an Unturned server. The process is relatively straightforward and can be done by following step-by-step instructions.
Can I customize my Unturned server with mods and plugins?
Yes, you can customize your Unturned server with various mods and plugins to enhance your gaming experience. However, be sure to research and only download mods and plugins from trusted sources to avoid any compatibility issues or security threats.
How many players can join an Unturned server?
The number of players that can join an Unturned server depends on the server’s hosting capabilities and the game’s settings. Some servers can accommodate up to 24 players, while others can handle more than 100.
How much does it cost to set up an Unturned server?
The cost of setting up an Unturned server will vary depending on the hosting provider and the server’s specifications. Some hosting companies offer affordable options, while others may charge a higher price for more advanced features.
Can I password protect my Unturned server?
Yes, you can password protect your Unturned server to make it private and only accessible to those who have the password. This is useful for playing with a group of friends or for hosting events on your server.
Are there any resources available to help me troubleshoot issues with my Unturned server?
Yes, there are various online resources, such as forums and community groups, that can provide support and troubleshooting tips for setting up and managing an Unturned server. You can also reach out to the game’s developer for assistance.