
Having a contact structure on your site is comparably fundamental as critical as having a phone in your office. In our ongoing reality where solace is the big enchilada, it allows your clients (and potential clients) to contact you at whatever point of day. To be sure, even the most fundamental contact structures offer an amazing technique for getting leads, fostering your email list, and interacting with your group. There’s just a single diversion: HTML. Construct top notch HTML structures in minutes.
![How To Create an HTML Contact Form from Scratch [2022]](https://gplfreetheme.com/wp-content/uploads/2022/07/SSS-1024x615.jpg)
HTML (Hypertext Markup Language) is the standard code used to make the greater part of the destinations and applications on the web. Furthermore, also with any language, beside the language of fondness, it’s not something you can learn in one night.
Luckily, you can make a HTML contact structure without committing your life to coding. Sorry don’t too if you don’t have even the remotest clue about your UTF-8 from your SRC – here, we’ll guide you through all that you need to know about to start creating a HTML contact structure today.
Before we start, require one second to consider the remote possibility that you really need to make a design using HTML. Things are much less troublesome when you use a design building gadget like Paperform – you’ll make a predominant looking and more-great contact structure in a little piece of the time.
Five steps to creating an HTML contact form
- Choose an HTML editor.
- Make a file with a .html extension.
- Make a file with the .php extension.
- Generate the PHP code to capture form data.
- Create your HTML contact form.
1. Choose an HTML editor
To make HTML code, you need a HTML manager. It helps convert the code into anything you’re endeavoring to make – for this present circumstance a contact structure.
Consider a HTML manager like a one of a kind word processor unequivocally for making things for pages. You use any word processor to make HTML code, in any case, committed editors offer significantly more convenience and value.
There’s no lack of incredible HTML editors. A few famous choices include:
- Notepad++
- Codepen
- Atom
- CoffeeCup
- Brackets
- Kompozer
- Sublime Text 3
Any of the above instruments will finish the work, yet there are many choices assuming you’re the sort that likes to search for the ideal arrangement. Most are free, so you can evaluate a couple and see which turns out best for you.
2. Make another document with the. HTML expansion
Then, you really want to give your stirring system the head’s up that you’re making another HTML record. Luckily, this step is really essential. You ought to make one more record with your HTML editor and save it with the ‘.html’ development.
Name the archive and follow it with .html. While you’re overseeing code it’s ideal to keep things clear, so we suggest naming the archive ‘contact_form.html’ or something practically indistinguishable.
Whenever you’ve named it, type it into the text field. This reports to your ideal editor to make HTML code. It’s like when you play Pretenses and sign the class you’re doing before you start acting it out.
Your director will thus make the going with code for you. It’ll be comparative whether you’re making an essential contact structure or an entire HTML site.
<!DOCTYPE html>
<html>
<head>
      <title></title>
</head>
<body>

</body>
</html>
3. Create a new file with the .PHP extension
Presently you need to make another record. However this time you need to save it with the ‘.php’ augmentation. This one takes care of the structure accommodation cycle and ensures the information you gather from your respondents goes where you really want it to.
Without the PHP record, your structure resembles a vehicle without a motor – the information will stay put. Seeing the resource structures is to gather data, this makes it sort of fundamental.
The PHP record is associated with your structure by a line of code in your HTML (we’ll get to that in the following stage). You can see what it resembles underneath:
<form id="fcf-form-id" class="fcf-form-class" method="post" action="contact-form-process.php">
4. Generate the PHP code to capture form data
So the PHP record empowers you to catch information (name, email, message, and some other info type you’ve included). It then conveys it directly to your email address as a plain instant message.
Beneath we’ve included PHP code that, in specialized terms, approves client inputs on the server-side. To decipher that from gobbledygook: ensures everything works. It likewise creates any blunder and affirmation messages that clients might get when they finish up your structure.
Reorder the beneath code into the .php record. You should add your own email, title, and achievement message (they’re framed inside the code).
<?php
if (isset($_POST['Email'])) {
// EDIT THE FOLLOWING TWO LINES:
$email_to = "you@yourdomain.com";
$email_subject = "New form submissions";
function problem($error)
{
echo "We're sorry, but there were error(s) found with the form you submitted. ";
echo "These errors appear below.<br><br>";
echo $error . "<br><br>";
echo "Please go back and fix these errors.<br><br>";
die();
}
// validation expected data exists
if (
!isset($_POST['Name']) ||
!isset($_POST['Email']) ||
!isset($_POST['Message'])
) {
problem('We're sorry, but there appears to be a problem with the form you submitted.');
}
$name = $_POST['Name']; // required
$email = $_POST['Email']; // required
$message = $_POST['Message']; // required
$error_message = "";
$email_exp = '/^[A-Za-z0-9._%-]+@[A-Za-z0-9.-]+\.[A-Za-z]{2,4}$/';
if (!preg_match($email_exp, $email)) {
$error_message .= 'The Email address you entered does not appear to be valid.<br>';
}
$string_exp = "/^[A-Za-z .'-]+$/";
if (!preg_match($string_exp, $name)) {
$error_message .= 'The Name you entered does not appear to be valid.<br>';
}
if (strlen($message) < 2) {
$error_message .= 'The Message you entered do not appear to be valid.<br>';
}
if (strlen($error_message) > 0) {
problem($error_message);
}
$email_message = "Form details below.\n\n";
function clean_string($string)
{
$bad = array("content-type", "bcc:", "to:", "cc:", "href");
return str_replace($bad, "", $string);
}
$email_message .= "Name: " . clean_string($name) . "\n";
$email_message .= "Email: " . clean_string($email) . "\n";
$email_message .= "Message: " . clean_string($message) . "\n";
// create email headers
$headers = 'From: ' . $email . "\r\n" .
'Reply-To: ' . $email . "\r\n" .
'X-Mailer: PHP/' . phpversion();
@mail($email_to, $email_subject, $email_message, $headers);
?>
<!-- INCLUDE YOUR SUCCESS MESSAGE BELOW -->
Thanks for getting in touch. We'll get back to you soon.
<?php
}
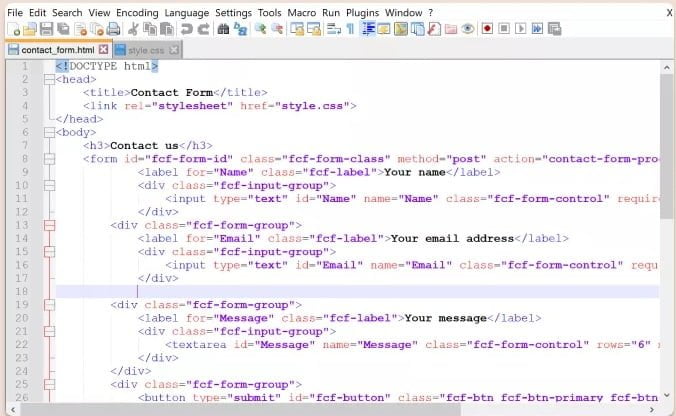
?>5. Create your HTML contact form
All that is left is to make your structure. We’ve incorporated a layout that will produce a fundamental HTML contact structure for you. Simply duplicate the code straightforwardly into your supervisor of decision.
<!DOCTYPE html>
<head>
    <title>Contact Form</title>
</head>
<body>
    <h3>Contact us</h3>
    <form id="fcf-form-id" class="fcf-form-class" method="post" action="contact-form-process.php">
            <label for="Name" class="fcf-label">Your name</label>
            <div class="fcf-input-group">
                <input type="text" id="Name" name="Name" class="fcf-form-control" required>
            </div>
        <div class="fcf-form-group">
            <label for="Email" class="fcf-label">Your email address</label>
            <div class="fcf-input-group">
                <input type="email" id="Email" name="Email" class="fcf-form-control" required>
            </div>
        <div class="fcf-form-group">
            <label for="Message" class="fcf-label">Your message</label>
            <div class="fcf-input-group">
                <textarea id="Message" name="Message" class="fcf-form-control" rows="6" maxlength="3000" required></textarea>
            </div>
        </div>
        <div class="fcf-form-group">
            <button type="submit" id="fcf-button" class="fcf-btn fcf-btn-primary fcf-btn-lg fcf-btn-block">Send</button>
        </div>
</body>
</html>
If you’re new to HTML, it’s truly brilliant to get the general embodiment of what the code suggests. On the off chance that not you could be making an exceptionally quick A.I. besides, not even know it.
The “input” tag portrays where clients can enter data, while the “mark” request tends to a caption for a thing in the UI (like where it says ‘Your Name’ over an entry field). “H1” marks the heading, and “div” acts like a bookmark confining different parts of the code.
One of the primary parts is the “structure-action” associating with the PHP record. Without this to interface the HTML with the PHP record, your design is basically doing a respectable impression of a contact structure. It’ll look right, yet it won’t actually work.
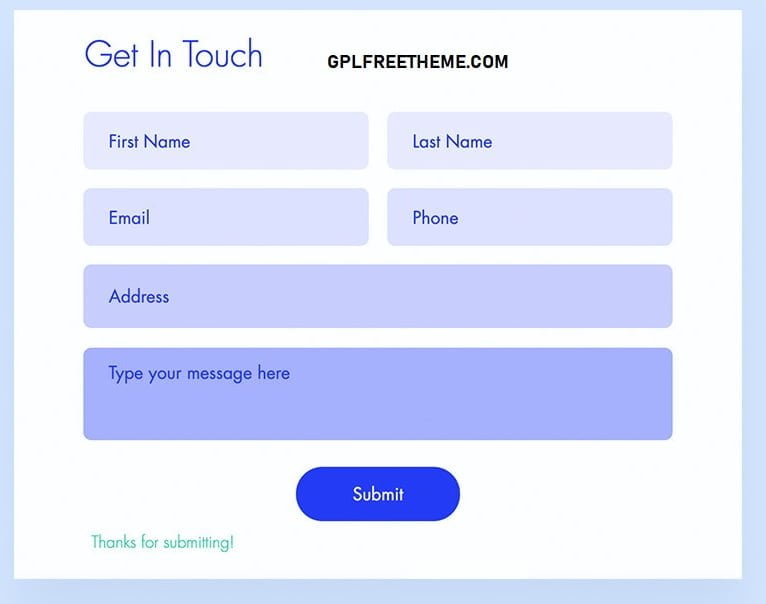
Exactly when you’ve entered the code it will make a design that is by all accounts this:
Contact shapes oftentimes have dropdown boxes as well as standard design fields. You can without a doubt add one of your own with the going with lines of code:
 <label for="contact reason">Contact Reason</label>
    <select id="contact reason" name="contact reason">
      <option value="sales">Sales</option>
      <option value="help">Help</option>
      <option value="billing">Billing</option>
    </select>
You can also add a checkbox, which is a useful way to get customers to opt-in to your email newsletter.
<input type="checkbox" id="newsletter" name="newsletter" value="newslettersignup">
  <label for="newsletter">Join our newsletter</label><br>
- SEO Meta Tag Generator Tool – Create Meta Tags Online

- Google AdSense Revenue Calculator

- WordPress Theme Detector – Detect Any WordPress Theme & Plugins
- Tecno Spark 30C 5G launched: Budget-Friendly Phone

- Efficient Java Mastery: From Zero To Hero Video Courses [2025]
![Efficient Java Mastery: From Zero To Hero Video Courses [2025]](data:image/svg+xml;base64,PHN2ZyB4bWxucz0iaHR0cDovL3d3dy53My5vcmcvMjAwMC9zdmciIHdpZHRoPSIzMDAiIGhlaWdodD0iMTY5IiB2aWV3Qm94PSIwIDAgMzAwIDE2OSI+PHJlY3Qgd2lkdGg9IjEwMCUiIGhlaWdodD0iMTAwJSIgc3R5bGU9ImZpbGw6I2NmZDRkYjtmaWxsLW9wYWNpdHk6IDAuMTsiLz48L3N2Zz4=)
- Adobe Premiere Pro Masterclass: Video Editing in 30 minutes
- Reading Progress Bar in WordPress Without Plugin?
- How to Get Google News Approval on Blogger [2025]
- How to Add a Reading Scroll Progress Bar to Your WordPress Site (Without a Plugin)


![Efficient Java Mastery: From Zero To Hero Video Courses [2025]](https://gplfreetheme.com/wp-content/uploads/2025/01/Efficient-Java-Mastery-From-Zero-To-Hero-Video-Courses-2025-300x169.webp)


Recommended Theme: Newspaper v10.3.7 WordPress Theme Free Download [Activated] – Beaver Builder Pro v2.4.0.6 Plugin Free Download [2020] – Newspaper v10.3.6.1 Theme Free Download [Activated] – Bimber v8.5.1 WordPress Theme Free Download [2020] – GeneratePress Premium v1.12.2 Stable Free Download [2020] – Astra Pro Addon v2.6.4 Latest Version Free Download [2020] – REHub v12.9.3 WordPress Theme Free Download [Activated] – Bimber v8.5.0 WordPress Theme Free Download [Activated] – Jupiter X v1.20.1 WordPress Theme Free Download [Activated] – Extra Theme v4.6.5 Latest Version Free Download [Activated]
Recommended Plugin: Yoast SEO Premium v14.6.1 Latest Version Free Download [2020] – Yoast SEO Premium v15.0 Plugin Free Download [2020] – GeneratePress Premium v1.12.1 Stable Free Download [2020] – Astra Pro Addon v2.6.4 Latest Version Free Download [2020] – WP Rocket v3.7.2 Premium Plugin Free Download [2020] – GeneratePress Premium v1.12.2 Stable Free Download [2020] – Mailster v2.4.14 Plugin Latest Version Free Download [Activated] – WP Smush Pro v3.7.1 Plugin Free Download [Activated] – Elementor Pro v3.0.5 Plugin Free Download [Activated] – Divi Builder v4.6.5 +1347 Premade Layouts Free Download [2020] – Restrict Content Pro v3.4.4 – With 17 Addons Free Download